


- Details
- Category: FTH4
-
By Richard Taylor
- Hits: 266
Name Tags
Creating Easy, Inexpensive Name Tags with FreeToastHost
Name tags promote familiarity between members and provide a mechanism for visibly recognizing officer roles.
Tips for creating name tags with less stress and less cost, using FreeToastHost
- Only print name tags on plain paper and cut them out.
Most name tag "kits" that you can purchase at an office supply store will come with name tag holders and perforated card stock to print the name tags on. FTH strongly recommends that you do not print on the card stock, but just insert the blank card stock name tags in the card holders behind the paper name tags you print to "stiffen up" the name tags.
The reason for this is that most clubs will have members who will progress through the programs and get educational/leadership awards. Also, members may become officers. Officer roles are beneficial to put on name tags. This means that name tags would need to be reprinted occasionally. If you print on the perforated cardstock instead of plain paper, you will soon find yourself having to replace the card stock by buying more name tag kits.
If instead you print on plain paper, you can just recycle the name tag holders. You will not need to spend a lot of extra money on new name tag kits due to printing mistakes, or changes in officer status. If you want to make straight paper cuts, you can get a rotary trimmer, but scissors should also work fine.
- Always ask for members to return their name tags at the end of each meeting.
Many members will just assume that their name tags are theirs to keep. As a result, the name tags will tend to get lost, and you will likely find yourself reprinting name tags frequently. Therefore, you should always treat the name tags as club property (meeting supplies) and ask for them to be returned at the end of each meeting.
It may take a bit of "training" to get members used to turning in their name tags at the end of each meeting, but over time they will begin to appreciate the value of this approach since they will not need to remember to bring their name tag to the meeting.
A suggested practice is to keep the name tags in a clear plastic zipper bag that is labeled NAMETAGS (with a permanent marker so the bag is not discarded) with your meeting supplies . Moreover, if you use this approach, it's easy to reprint name tags with updated member accomplishments and officer roles, since you will already have the name tags with the meeting supplies instead of having to request them back from members to update them.
- To make it easy for members to find their name tag when they arrive at a meeting, you can print extra pages of name tags to use as a sorting guide.
Name tags are printed in alphabetical name order. If you take advantage of this fact, then you can print a second set of pages containing name tags that you do not cut out—just use these full pages at the meeting as a guide and lay the finished name tags over top of their corresponding duplicates in the full pages. You will find that this makes quick work of sorting name tags at meetings.

Make Name Tags
The Name Tags tool is designed to make it easy to create and print member name tags with a minimum of effort. The tool provides a number of built-in templates in various label sizes for your use as a starting point in creating your own club name tags. In many cases, the provided templates will be sufficient, but you should feel free to experiment with your own custom templates. These can be saved and used with any size available in the 'Label size' drop-down list.
Officers who have access to Membership Management will find it in the 'Club Tools' section of their member dashboard. The Club Admin will find it in the 'Officer Centric' section of the admin console.
Open the Membership Management console and select the Name Tags button.
The Name Tag console is organized in three sections.
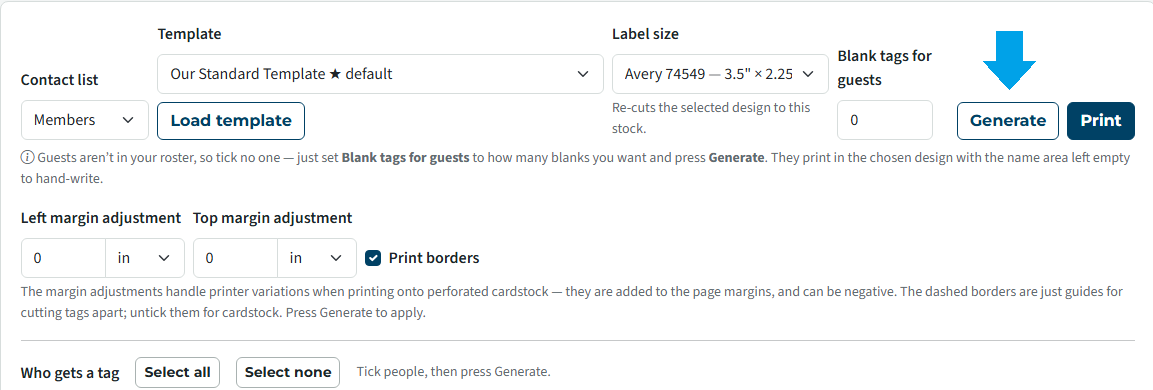
Settings (the top section)
This area contains the items to set when you wish to print name tags.
- Select the contact list you wish to use.
- Be sure to check the 'Who gets a tag' section and adjust the ticks as needed.
- Select the template from the drop-down list and click the 'Load Template' button.
Note: Don't forget to untick any {dummy members} that may be in your members list.
- My Templates only: Select a size from the 'Label size' drop-down list.
- When using the 'Built-in club design' or 'Built-in district design' templates, there's no need to set a Label size. This will auto-adjust to the selected built-in template.
- Your template and label size settings should match the name tag kit and holders that your club decided to purchase. Note that more templates may be added in the future, depending on users' needs. (If you would like to see a new template added, let us know.)
- Add a number of blank tags if desired.
If you wish to print ALL blank tags, ensure no names have a tick in the 'Who gets a tag' section.
Optional settings.
Use the margin adjustment settings as needed for your printed media. These settings are not visible in the preview. You must check them in the print preview.
Left Margin Adjustment – If you need to shift the table containing the name tags horizontally on the printed page, you can do that with the Left Margin Adjustment. Negative values are permitted, and you can enter the adjustment value in inches, centimeters, or millimeters. Typically you would use this setting to adjust for printer variations or to shift the table containing the name tags when printing on perforated name tag cardstock or other similar media. (Printing on cardstock is not recommended.)
Top Margin Adjustment – If you need to shift the table containing the name tags vertically on the printed page, you can do that with the Top Margin Adjustment. Negative values are permitted, and you can enter the adjustment value in inches, centimeters, or millimeters. Typically you would use this setting to adjust for printer variations, or to shift the table containing the name tags when printing on perforated name tag cardstock or other similar media. (Printing on cardstock is not recommended.)
Print Borders – Borders can be printed around each name tag to aid in properly cutting them out for use. Generally, you should leave this check box ticked unless you are printing on perforated name tag cardstock. (Printing on cardstock is not recommended.) This option is visible in the preview area as dashed lines around the name tags.
Select the 'Generate' button when satisfied with your settings.
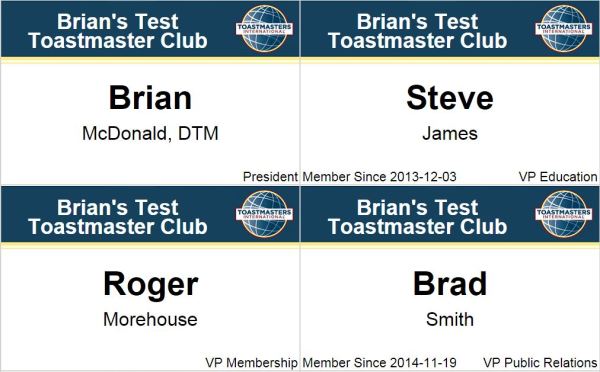
Name tag preview (the bottom section)
Study this section to ensure it shows what you expect to see based on your settings.
Proofing and Printing. Once you have generated your layout, you should print some proof pages to check that the name tags are printing as intended. Here are some tips to ensure that the name tags will print properly.
Make sure that printing background images is enabled. The logo image that is included in the templates is a background image. Different browsers require different approaches to enable printing background images. However, frequently this setting is enabled in the browser's print preview screen (applies to Internet Explorer and Chrome). To get to the browser's print preview screen, you must cancel the print dialog that shows once you click the Print button of the Make Name Tags dialog and use your browser's print preview to enable printing background images.
Be careful making margin adjustments in the print preview screen. Our printed page table has been set up to try to force printed page margins to be correct for proper printing. If you make margin adjustments, avoid making any changes that will change the overall width and height of the table containing the name tags for printing.
Customize name tag templates (the middle section)
This section shows the design elements included in your selected template.
'Template Name' shows the currently selected template in the settings (top) section.
Create a new template
- Select the + New Template button.
- Type a name in the 'Template Name' box.
- Customize the template as desired in graphical editor.
- Select 'Save Template'.
- Set up a print and check your new template layout.
The branded tag logo and colors are fixed. You can make various adjustments to the layout by changing fonts, font sizes, background images, and by selecting which of the following variables you wish to show on your name tags (More may be added in the future.):
{[firstname]}{[lastname]}{[namesuffix]}{[membersince]}{[officerrole]}{[clubname]}
{[membersince]} is the 'Joined Club on' date in the member profile.
If a multi-part first name or surname or a name suffix appear out of place on a name tag, adjust the member's name format in Membership Management.
To rename a template; 1) Load the template 2) Edit the Template name as desired 3) Select 'Save template'.
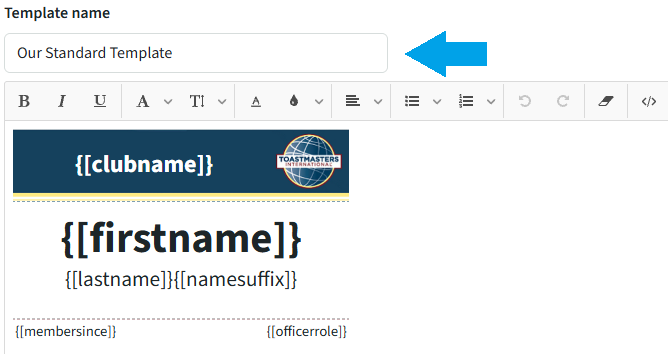
Limit your attempted edits to the four rows shown in the default graphical view of the new template. Due to the available size of standard name tags, customizations are limited. If something doesn't align or look right, delete the template and start over, making different customizations.
Please let us know how this feature is working for you. We rely on your feedback to let us know where we can make improvements.

Latest Forum Posts
-
- Level 4 - Create a Podcast sets incorrect timing o...
- In Public Forums / FTH4 Support
- 33 minutes ago
-
- Unable to Edit Main Heading
- In Public Forums / FTH4 Support
- 34 minutes ago
-
- "Order" column on Agenda Templates tab.
- In Public Forums / FTH4 Suggestions and Improvements
- 43 minutes ago
-
- GoAccess
- In Public Forums / FTH4 Support
- 47 minutes ago