
- Details
- Category: Documentation
-
By Jane Atkinson
- Hits: 12978
Main membership panel
• To access the membership area, select it from the pull-down menu in the admin console.

Adding members
If you need to add a number of members or guests at once, use the Quick Add tab.
Add a single member by entering name, email address and phone number in the top line, where it says NEW. Then click the SAVE button.

The underscore character "_" can be used as a "non-breaking space" in multi-part first names and surnames (e.g. John Van_Buren) to force the system to properly recognize the parts of the name. This helps the system determine the correct first names and surnames in features that split names, such as the Name Tags feature. The "_"'s are replaced with regular spaces wherever else names are used.
Additionally, if you add suffixes to names for Toastmasters awards (e.g. "Steve James, DTM"), make sure that you use a comma to separate the proper name from the suffix if you intend to use features that split names, such as the Name Tags feature. The software code that splits the names expects to see a comma between the last name and any suffixes. If you do not do this (e.g. "Steve James DTM"), the code will likely think that the suffix is the person's last name.
When you have saved the entry, you will see the following screen:

The new member's details are saved to your website. An email is sent to them so they can confirm their assent to being added, and a copy is sent to the officers selected in the Membership Management Settings tab. The officers' copy does not contain the clickable links.
Until the member has "opted-in", they cannot login, nor can they be assigned an officer role or an agenda role, among other things.Their details will be visible, but with a line through them.

The new member has 30 days to opt-in. At the end of that time, if they still haven't done so, they will be deleted from the site.
Once the new member has opted-in, the strikeout line will be removed from their entry, and you can proceed to use the other membership options described below.
Membership tools
Click in the box at the left of the row to select one or more members. When you click in any row to edit a person's information, the checkbox for that single row is automatically checked for you.

Then choose an option from the Membership Tools pull-down menu.
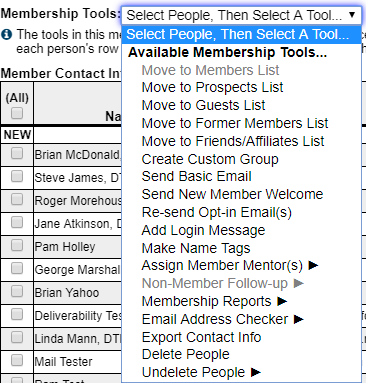
Greyed out options can't be selected. They apply to other panels (see below).
Some of these options are fairly self-explanatory; others can be accessed elsewhere as well and are described separately. The following options are covered in more detail here.
Send basic email
You can use this to send an email to one or more members. You are automatically sent a copy for your records.
If you send an email to several members at once, you receive a single copy, beginning with a list of names to which it was sent.
You can use Email Tools to make use of templates and signatures.
You can't use CC or BCC, or add an attachment. If you need to do any of these things, use your regular email package.
Resend Opt-In Email(s)
From time to time, you may have a new member who wishes to opt-in to the website but who has lost or not received the opt-in email. This option allows you to resend the email.
Add Login Message
This is useful for sending a notification to a member, without needing to use email. The member will see it next time they log in. Currently, members can't reply to these messages, though that may be added to a future version of FreeToastHost.
Make Name Tags
This creates name tags from your member information. See separate page: Creating Easy, Inexpensive Name Tags with FreeToastHost.
Assign mentors
See separate page: Assigning Mentors to Members
Membership reports
Create member reports — contact information, mentoring information, guest follow-up — as html. You can print these immediately, or save them to your computer for further editing.
Email Address Checker
It is reasonable to expect that about a third of the contact emails in Membership Management will be changed each year, according to Litmus (https://litmus.com/community/discussions/5343-what-is-the-average-lifespan-of-an-email-address), which is considered to be an authority on email best practices. Additionally, people may sometimes forget to tell you when they have changed their email addresses.
The Email Address Checker tool gives you a simple way to check one or more email addresses for people listed in any of the Membership Management lists. The tool will tell you which email addresses are no longer working ("Bad"), so that you can either ask the relevant person for a new email address or you may choose to delete the person's contact information from Membership Management--read below for more details on deleting contact information.
Export Contact Info
This is a way of saving a version of members' contact information on your computer. It is not a backup that can be reloaded onto the website later.
It does NOT export passwords.
It downloads the information as a csv file, which can be opened in any spreadsheet program.
If no selection is made, it will export ALL names from all lists (members, guests, former members etc).
Delete People
This removes names and information that you no longer wish to keep on your website. It is usually preferable to move members who have left the club to the former members list, in case they return later on. However, there may be occasions when complete removal is a good idea. You may also wish to prune your guest list from time to time, especially if you think that some of them are very unlikely to be heard from again.
Undelete People
Deleted names can be undeleted, provided it is done within 30 days of deletion. After that, they can't be recovered.
Assigning officer roles to members
Click on the Officer Roles pull-down menu. You may select up to three roles per member.

To remove all roles from a member, click on Uncheck all at the top of the pull-down.
View/edit member profile
This allows you to view and in some cases edit a member's profile. You can also use this to upload a photo for a member. You may only edit a member's profile if they have checked the setting to allow the admin to do so.
See the separate View/edit member profile for further details.
Latest Forum Posts
-
- Google Console Analytics
- In Public Forums / Support Requests
- 5 hours 38 minutes ago
-
- Officer and Member EMail DLs Not working
- In Public Forums / Support Requests
- 1 day 2 hours ago
-
- Email on Free ToastHosts not going through
- In Public Forums / General Discussion
- 1 day 20 hours ago
-
- Custom Domain Name Expiring
- In Public Forums / Support Requests
- 2 days 3 hours ago
-
- down site Madera toastmasters 776147
- In Public Forums / Support Requests
- 2 days 12 hours ago