


- Details
- Category: Documentation
-
 By Jane Atkinson
The Custom pages area allows you to create and edit additional pages. You may have as many of them as you wish.
To go there, choose Custom Web Pages from the main pull-down menu.
You are shown the screen for creating a new page, with an edit window and a number of fields to fill in. To edit an existing page, select the page from the pull-down menu.
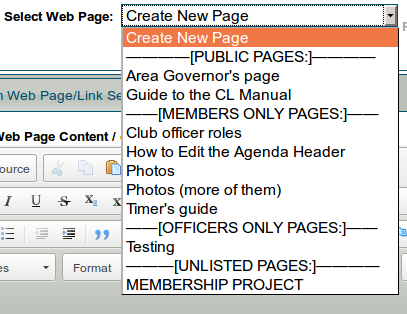
If you haven't created any custom pages yet, you'll see nothing in this list except "Create New Page". Just start typing in the Edit window to add content, and fill in the other details as noted below before saving your first page.
Edit window
This is a WYSIWYG editor like a word processor. Add your content here.
(If you want to create a link, see adding links to other sites.)
For more details on creating and editing pages, see adding and editing content
Web Page Tools are for backing up and restoring text, replacing and rotating images, and checking for bad links. See Backing up custom content and Adding and Editing Page Content for details.
Page details
Your page or link needs a few details so that it can be found on the internet. The following fields allow you to add these.
Web Page Title / or Link Title
Is the name that shows in the browser window bar and also in the menu listing.
Menu Position #
This lets you have custom pages in a different order than alphabetical. The larger the number, the further down the list the menu entry appears.
Relocate this Web Page's Menu Entry
This is another way to relocate the menu position of a page quickly.
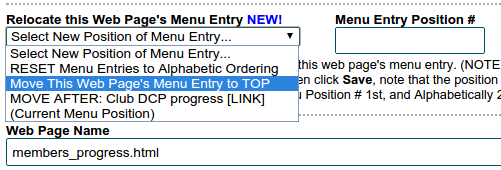
You can choose top of the menu, or before/after a specific page. You can also reset the menu ordering to alphabetical order.
Web Page Name
Is the URL or address of the page (what you would type in your browser to go to the page). It will end in html
Leave this blank if you're creating a link.
Important:
The following page names are reserved by the system for its own use. DO NOT USE THEM.
- directions.html
- meetourmembers.html
- calendar.html
- member_downloads.html
- downloads.html
- unsubscribe.html
- agenda.html
- agenda-######.html (where ##### is some number)
- agenda-new.html
Web Page Description
When a person searches for the page in a search engine, this description is what they'll see. Therefore, make sure that it's accurate, easy to read and interesting.
Leave this blank if you're creating a link.
Web Page Keywords
Individual words or brief phrases that relate to the page. This field is much less important than the Description, and some search engines ignore it altogether.
Leave this blank if you're creating a link.
Web Page Reference Notes
Use this area to make notes about things that the next administrator may need to know, such as where you got a picture from, how you embedded a video, and so on.
Page Type
This setting determines which menu your page appears in and who can access it.

There are four choices.
-
Public - accessible to anyone.
-
Members only - accessible to members only, but the link can be seen by anyone.
-
Officer only - accessible only to officers and the link is visible (in the Members Only menu) only to a logged-in officer.
-
Unlisted access - the link doesn't appear in any menu. Note that it doesn't mean non-accessible. If someone knows or guesses the link, they can still access the page.
In other words, it is NOT secure.
Page type can be changed at any time.
Appearance
To access this, click on the Appearance tab near the top of the frame.
Here you can change the background colour of the page. See Appearance for details of how to do this.
- Details
- Category: Documentation
-
By Jane Atkinson
1: If Necessary, Request Your FreeToastHost 3 Website
- Visit http://www.toastmastersclubs.org/welcome
- Follow the instructions on the homepage to request your website.
- Once confirmed, you will receive an e-mail with the details of your new website.

Unchartered club
If your club hasn't chartered yet, you may still be able to get a FreeToastHost website. The club must have filed the Application to Organize, PAID the Charter Fee, and received a Club Number.
Please follow the procedure for not yet chartered clubs. Use the "please click here" link (arrowed in the diagram above) just above the Club Number field near the top of the form.
If your site already exists and you have the login details, you can proceed to the next step.
If your site administrator is unknown, has left the club or is being uncooperative, you can apply for a change of administrator.
The new login details get sent to the email address showing on the publicly-accessible Find-a-Club page on the Toastmasters International website (the FreeToastHost system has NO access to TI's database). Therefore, make sure that those details are up to date. See this page for information on how to do this.
Important:
There is only one official administrator and password. Your club can choose to share that password with more than one person. There is also no requirement for the administrator to be a member of the club.
2: Login To Your FreeToastHost 2 Website
- Once you receive your welcome e-mail, or if you already have these details, you can login by clicking the "login as site admin" button (the lower button in the screenshot) in the "Logins" left menu section. (This is just below the Main Menu section.)

- Enter your club number and temporary password as listed in your welcome e-mail, or as given to you by the previous administrator.
3: Launch the Admin Console To Setup Your Site
- Once you are logged in, the links in the "Logins" menu will change to show that you are logged in, and show the button to launch the admin console. Click the "launch admin console" button.

4: Using the Admin Console
The administration area is divided into several sections, which you can access from the pull-down menu.

Each section is further divided into smaller areas. Click on the tab near the top of the window to go to any one of them.

When you first open the admin console, it displays the Website Settings section and the Basic Settings tab. This section allows you to define important details about your club site.
If you are setting up a new site, not all of these need to be done immediately. Some can be left until later. Others are completely optional. See the Quick Start Page for an outline of important settings.
Important:
Only ONE administrator can be logged in at any time. If a second person logs in, the original one will be logged out. If you share the admin password with anyone else, make sure that you coordinate your access times so as not to cause problems.
This is a good reason for not sharing the admin password indiscriminately.
5: Activating your site?
This isn't necessary. Your site is already active and visible to the public from the moment that it's approved.
- Details
- Category: Documentation
-
By FreeToastHost
To create a map for your directions page
We recommend placing a map to your meeting location on your Meeting Information/Directions page. Doing this makes it very convenient for first time meeting guests to find your meeting location and provides a way for them to create directions from their home or office.
If you are a new website admin or you just don't want to deal with the technical details of generating the iframe code for embedding a map in your Meeting Information/Directions page, then the simplest thing to do is to just enter the street address of your meeting location in the Google Maps box in the Meeting Information/Directions tab of the Admin Console, then click the Save button. FreeToastHost 3 will take it from there and create a basic map for you. If you do this, keep in mind that the street address must be understandable to Google Maps, since we essentially just send it directly to Google Maps to create the map.
However, if you prefer finer control over your embedded map, then we recommend you check out one of the many available map providers on the internet. Although we designed the Google Maps feature with Google Maps in mind, you can use any map provider that can produce iframe embedding code. ("iframe" is just fancy jargon for a method to place a window to another website in your website.) Here are some of the various map providers that can provide iframe code--click on any of the names below to visit their website:
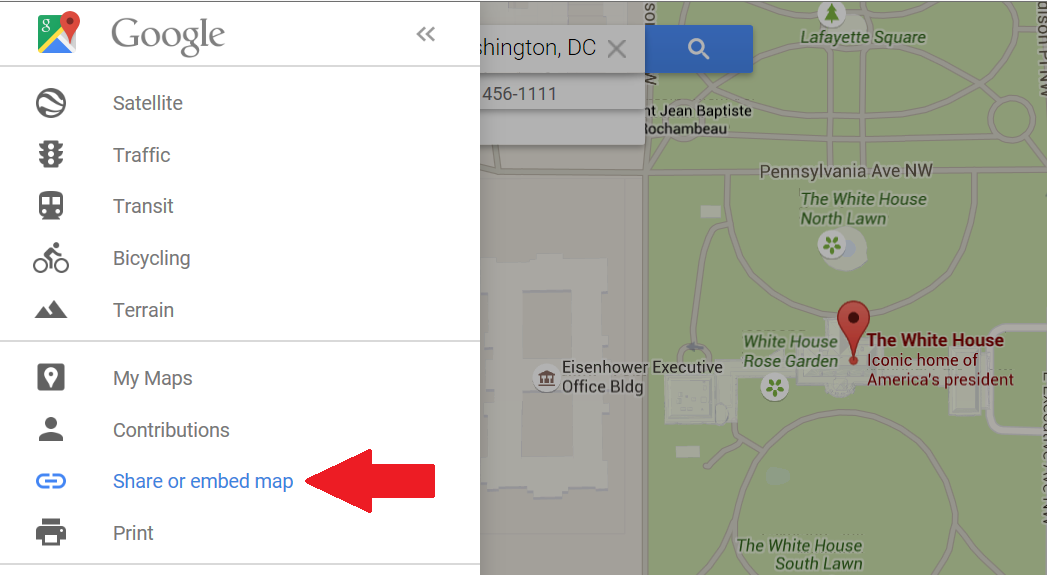
- Google Maps (Use the menu icon, the three bars, at the top left of the page.)
- Bing Maps (Select 'More' near the top right (right of page center), when the menu opens select </> Embed a map.)
- Waze Live Map (Enter your club meeting address in the 'destination' box then select Share on the left side. Select 'Embed' in the dialog box that opens.)
- OpenStreetMap (User Share button at right, then click HTML tab.)
For more details about using iframe code, see Adding and editing page content.
Steps to embed the map in your Meeting Information/Directions Page using <iframe> code:
- Go to the map provider of your choice.
- Use the available features in the map service to locate your meeting address.
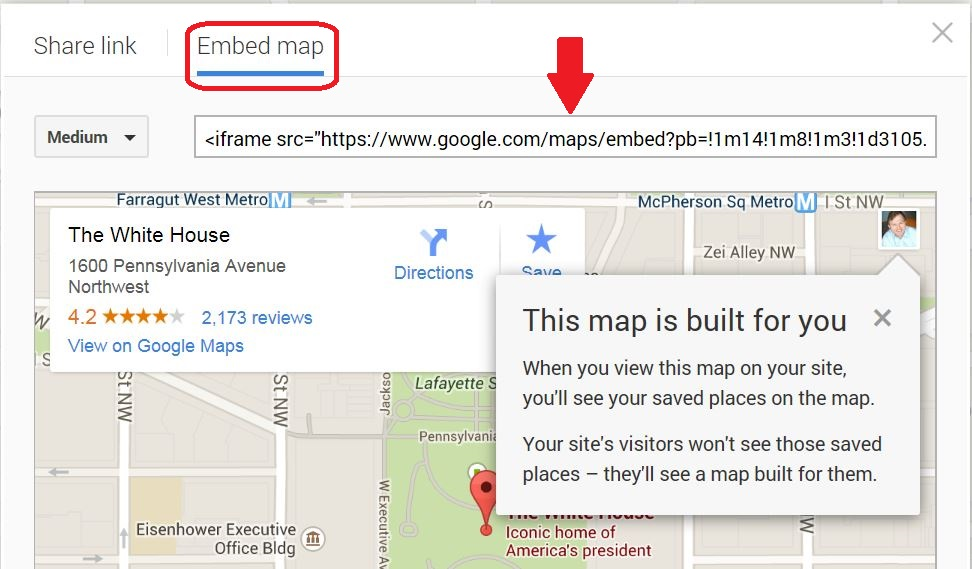
- Use the above italicized suggestions to find the appropriate Share or Link button and locate the iframe code. You should see some embed code there beginning with <iframe>--that is what you are looking for.
- Choose the view, embedded map size and zoom level that you want. If there are choices, choose embeddable html.
Note for Bing Maps: As of this writing, the embed code typically contains several <div> that are needed and must be included in the code you copy into your sites "Google Maps Address / iframe" box.
Note for Waze Live Map: See this page for information about available customizations (such as adding a pin): https://developers.google.com/waze/iframe - Copy that iframe code to the clipboard and paste it in to the Google Maps box in the Meeting Information/Directions tab of the Admin Console. Remember, although it says "Google Maps", it can also be used for any of the above. You can see what your map will look like if you click the "See the Map!" button--a window will pop-up showing your map.
- Save, then check your page by clicking on the "Meeting information / directions" link in the main menu, and make adjustments if necessary.
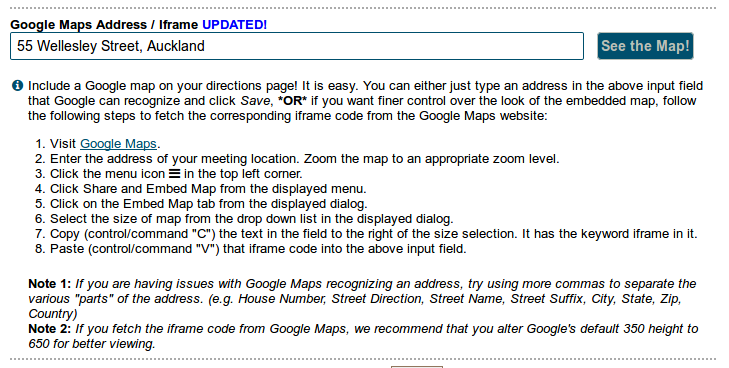
If you want to see what your map will look like without having to exit the Admin Console, then click the "See the Map!" button shown above, after entering an address or iframe code in the box to the left. Clicking the button will cause a pop-up window containing your map to be displayed.
As an example of what the <iframe> code looks like, here is what you would see as of this writing using Google Maps:
More Articles …
Page 22 of 29
Latest Forum Posts
-
- Club 1104 - who do I ask to fix the inaccurate rec...
- In Public Forums / FTH4 Support
- 48 minutes ago
-
- Modify or hide small club name between "Banne...
- In Public Forums / FTH4 Support
- 1 hour 56 minutes ago
-
- Club No. 1250 - Need to Edit our Club's Website
- In Public Forums / FTH4 Support
- 2 hours 30 minutes ago
-
- Club #6494 - Cedarbrae
- In Public Forums / FTH4 Support
- 2 hours 32 minutes ago
-
- The Admin-Entered Attendance (absent or excused) n...
- In Public Forums / FTH4 Support
- 4 hours 38 minutes ago