

- Details
- Category: Documentation
-
 By Jane Atkinson
Web page tools are found just above the WYSIWYG editor on the right hand side.

They include the following:—
Save contents to file
This tool saves the source (html) code of your page to a file on your computer.
The text is saved to your browser's downloads folder.
Load contents from file
This tool allows you to load the source code that you saved earlier. It will replace what is already on the page.
An obvious use is for those times when something has gone horribly wrong, but it can also be used if, for example, you've had a special meeting and want to change your page back to its usual appearance afterwards.
Before loading the contents, make sure you are on the page you want to restore.
Choose "Load contents from file" from the pull-down menu and select the correct text file when prompted.
Replace Image/Photo
From time to time, you'll want to replace an existing image on a page with a new one. This tool allows you to do this in a single operation.

Choose Replace Image/Photo from the Web Page Tools pull-down menu.

Select the existing image you want to replace in the upper pull-down list, and select the replacement image in the lower pull-down list.
If the image you want to replace isn't on the server, you can upload it from your computer with the Upload Image button.
There is also an option to delete the original image from the server, if it is one that has previously been uploaded to your site. (You cannot remove system images.) If you're going to do this, make sure that you have a backup somewhere, in case you need it again in the future.
Rotate Image/Photo
Sometimes, you may insert an image in you page and discover that it's lying on its side, or even upside-down. Using this tool, you can quickly and easily re-orient the image.

Choose "Rotate image" in the Web Page Tools pull-down menu.

Choose the image from the pull-down list, then choose the amount of rotation you need and click Rotate Image/Photo.
Note: You can only choose increments of 90 degrees. You can't use this tool to create other angles of rotation. If you wish to do that, you'll need to use an image manipulation program.
Check for bad links
Broken links cause annoyance and detract from the value of your page. They also slow down page load performance, particularly in the cases of images. This item gives you a quick and easy way to check for them.

Choose Link Checker from the Web Page Tools pull-down menu.

You'll be shown a list of working links, plus any that aren't working properly. Anything in the second list needs to be removed or fixed. Note that this also will include any image references that are broken--if you deleted an image in the wrong way, for example.
Insert Web Page Variable
Web page variables are items that will update automatically as the information changes. They are especially useful for dates, such as the next meeting date, which change regularly.
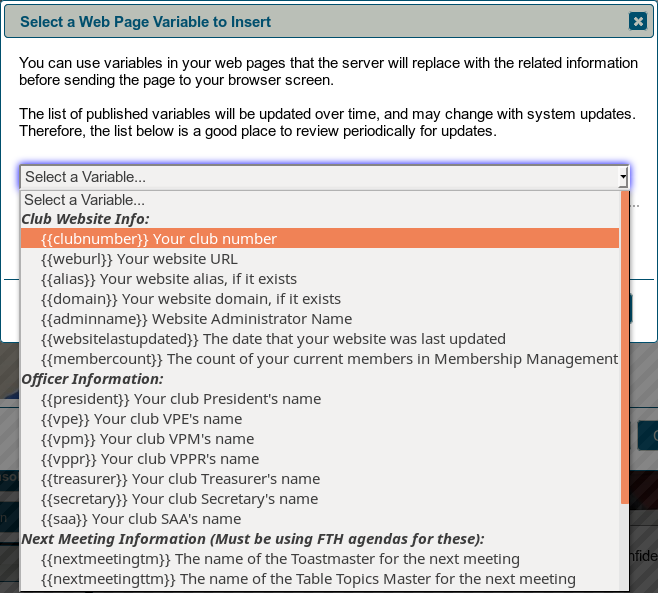
Select a variable from the pull-down list and, depending on your browser, it will be copied to the clipboard.
- Some browsers don't support this function. If the variable isn't copied, you can enter it yourself, making sure that it begins and ends with two curly braces.
The variable will still be visible in the page editor window after you've saved. To see the end result, close the editor.
In the case where the variable gets replaced by a photo or a map, the result may take up a significant portion of your available content width. Generally, you can wrap the variable in html "<div>" elements to control the width. If you are running into issues with this, please post a message in the support forums and we can coach you how to best handle this situation.
- Details
- Category: Documentation
-
By FreeToastHost
How do I add the TI Logo as a location marker in google maps?
This will explain how to add the TI Logo as a location marker, and also get rid of the "Talk Bubble" on Google maps when you place it on your club website in the directions page.
This process is is a bit complicated, and on the difficulty scale I would rate it 
I will explain some things, but you might have to go online and do some homework.
This is going to take some time for some... Here goes.
- Download the Toastmasters logo, resize it to a width of 34 pixels or a little less (keeping the ratio intact), trial and error here, will depend on your taste.
- Upload resized logo to your clubs website, and copy the URL. ( go to a custom page and use the editor to upload to your website)
![]()
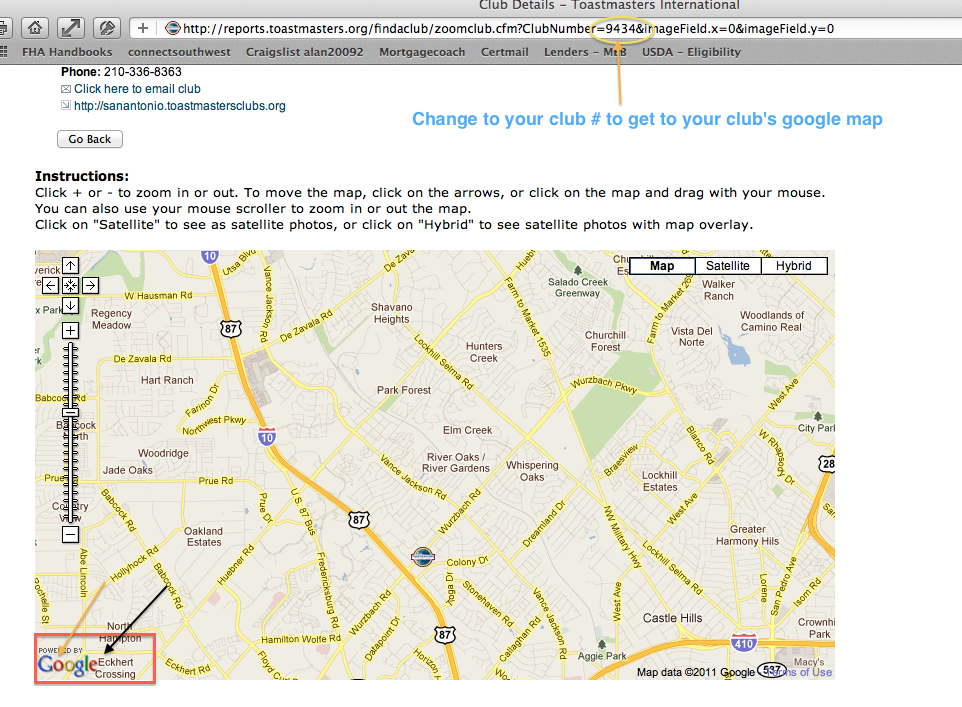
- Use this link and delete my club # and put in yours:
|
http://reports.toastmasters.org/findaclub/zoomclub.cfm?ClubNumber=9434&imageField.x=0&imageField.y=0 |
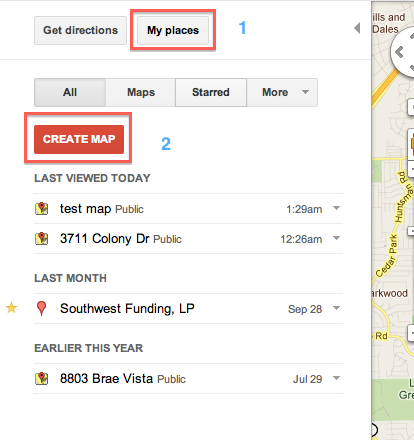
- Click on the google logo
- Click on My places
- Click Create Map
- Change name from untitled to someting else.
- Once you do that you will see 3 icons at the top left side of the map. (a hand, a drop pin and a squiggly line)
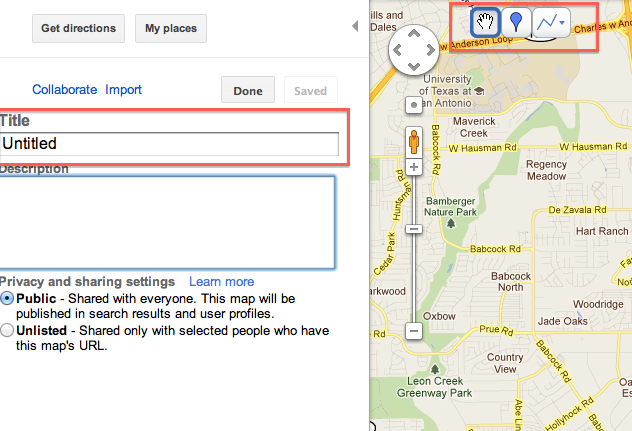
- zoom in enough to see where your location is on the map
- Now at this point click on the middle blue icon (drop pin) and drop it in the correct location.
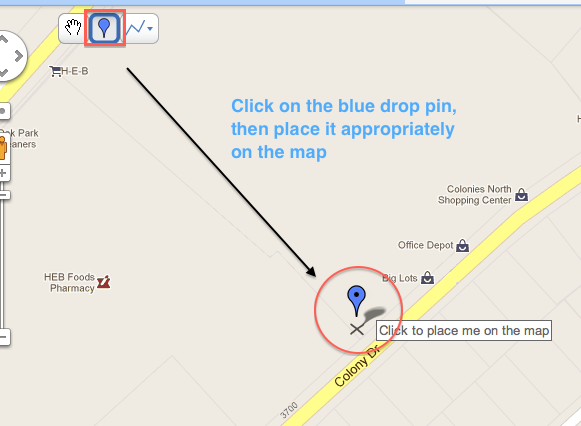
- name it appropriately
- click on the blue pin with the blue box around it (just to the right of the name)
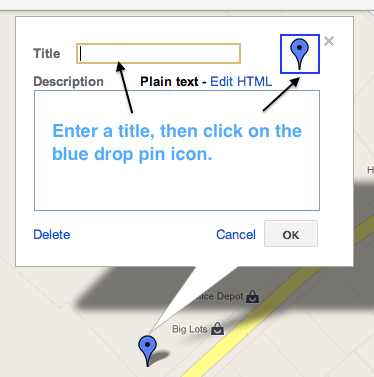
- click on the add an icon link
- paste in URL you copied previously (your tiny TI logo on your website)
- Save
- It should now look like this

- now click on the link button at the top right of the map
- then click on the customize and preview embedded map link

- (this is where you make your detailed changes) zoom out a few clicks (some trial and error on your part is needed here too)
- center the map the way you want it
- then copy and past the HTML it creates for you.

- DONE (whew!)
When you are done you should have a custom map with the TI logo as a location Marker and no "Talk Bubble".
________________________________
Alan McNamee, ACB/ALB
San Antonio President's Distinguished Club 9434
Club President
- Details
- Category: Documentation
-
By Jane Atkinson
In order to see the "Meet our Members" page, at least one member profile needs to be made public.
This can be done in two different ways.
1. The member makes their own profile public.
2. The admin accesses the profile of the member in question (from the membership management area) and makes the profile public.
See http://support.toastmastersclubs.org/doc/item/member-profile
Very Important
Check with the members before making profiles public, and respect their desire for privacy. They may have very good reasons for wanting to keep their details private.
More Articles …
Page 23 of 30