
- Details
- Category: Documentation
- By FreeToastHost
To create a map for your directions page
We recommend placing a map to your meeting location on your Meeting Information/Directions page. Doing this makes it very convenient for first time meeting guests to find your meeting location and provides a way for them to create directions from their home or office.
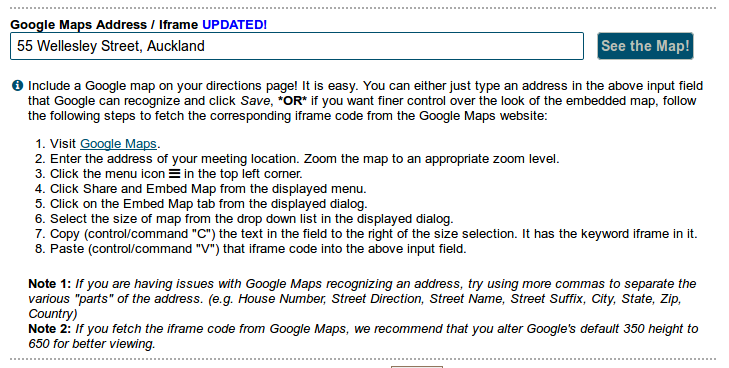
If you are a new website admin or you just don't want to deal with the technical details of generating the iframe code for embedding a map in your Meeting Information/Directions page, then the simplest thing to do is to just enter the street address of your meeting location in the Google Maps box in the Meeting Information/Directions tab of the Admin Console, then click the Save button. FreeToastHost 3 will take it from there and create a basic map for you. If you do this, keep in mind that the street address must be understandable to Google Maps, since we essentially just send it directly to Google Maps to create the map.
However, if you prefer finer control over your embedded map, then we recommend you check out one of the many available map providers on the internet. Although we designed the Google Maps feature with Google Maps in mind, you can use any map provider that can produce iframe embedding code. ("iframe" is just fancy jargon for a method to place a window to another website in your website.) Here are some of the various map providers that can provide iframe code--click on any of the names below to visit their website:
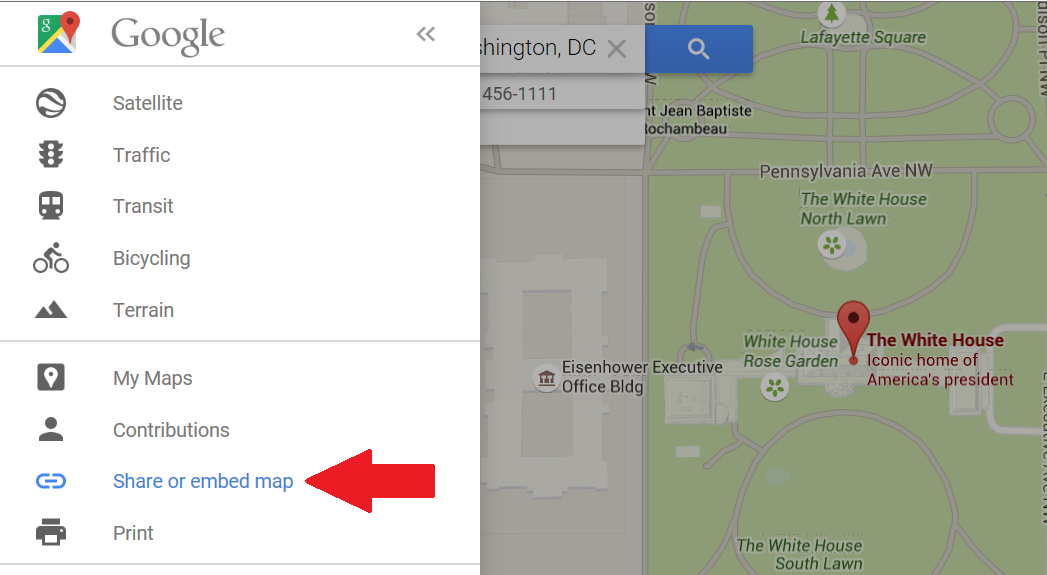
- Google Maps (Use the menu icon, the three bars, at the top left of the page.)
- Bing Maps (Select 'More' near the top right (right of page center), when the menu opens select </> Embed a map.)
- Waze Live Map (Enter your club meeting address in the 'destination' box then select Share on the left side. Select 'Embed' in the dialog box that opens.)
- OpenStreetMap (User Share button at right, then click HTML tab.)
For more details about using iframe code, see Adding and editing page content.
Steps to embed the map in your Meeting Information/Directions Page using <iframe> code:
- Go to the map provider of your choice.
- Use the available features in the map service to locate your meeting address.
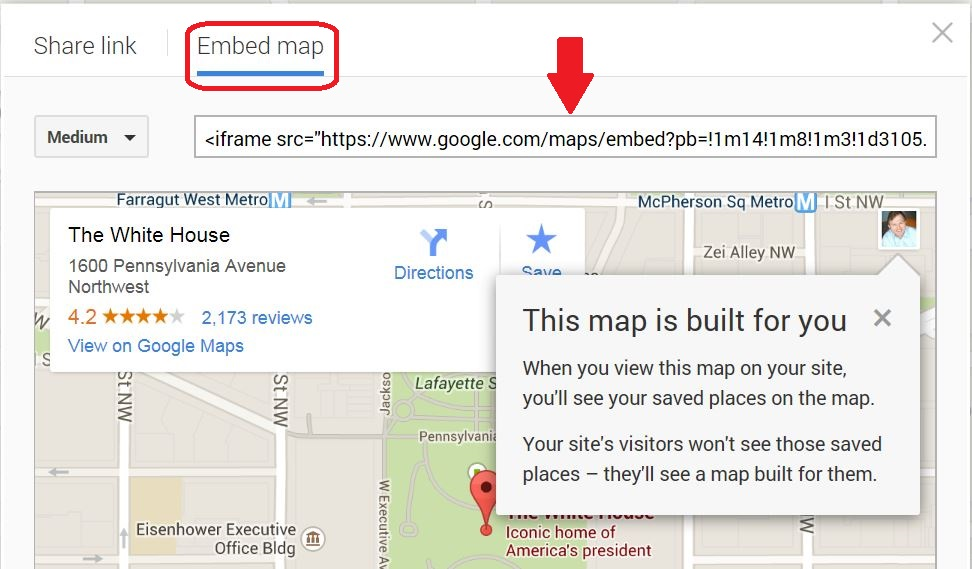
- Use the above italicized suggestions to find the appropriate Share or Link button and locate the iframe code. You should see some embed code there beginning with <iframe>--that is what you are looking for.
- Choose the view, embedded map size and zoom level that you want. If there are choices, choose embeddable html.
Note for Bing Maps: As of this writing, the embed code typically contains several <div> that are needed and must be included in the code you copy into your sites "Google Maps Address / iframe" box.
Note for Waze Live Map: See this page for information about available customizations (such as adding a pin): https://developers.google.com/waze/iframe - Copy that iframe code to the clipboard and paste it in to the Google Maps box in the Meeting Information/Directions tab of the Admin Console. Remember, although it says "Google Maps", it can also be used for any of the above. You can see what your map will look like if you click the "See the Map!" button--a window will pop-up showing your map.
- Save, then check your page by clicking on the "Meeting information / directions" link in the main menu, and make adjustments if necessary.

If you want to see what your map will look like without having to exit the Admin Console, then click the "See the Map!" button shown above, after entering an address or iframe code in the box to the left. Clicking the button will cause a pop-up window containing your map to be displayed.
As an example of what the <iframe> code looks like, here is what you would see as of this writing using Google Maps:


- Details
- Category: Documentation
- By Jane Atkinson
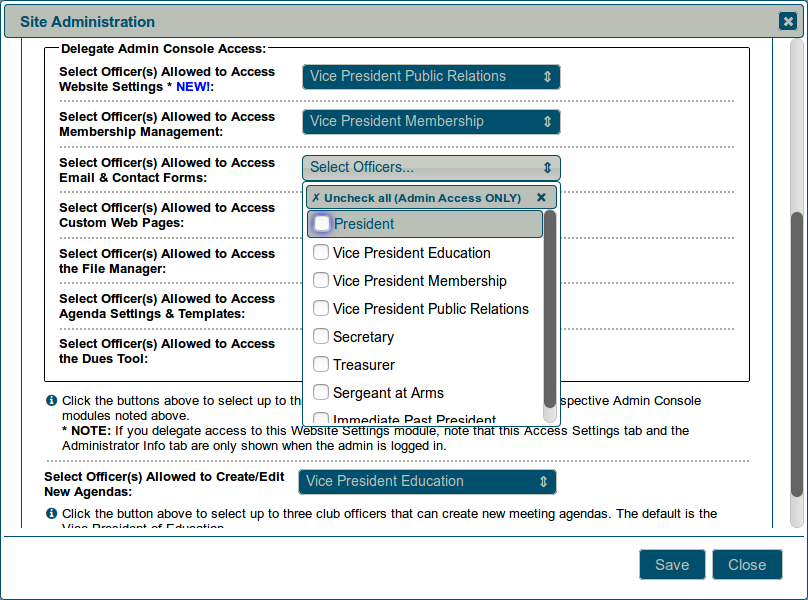
This area allows you to delegate access to certain areas of the website, without having to give out the admin password.
For example, you may wish to have the VP PR take care of updating custom pages and for VP Membership to be able to add new names to the membership list.
For each of the website areas that this feature supports, up to three officers may have access, in addition to the admin, who always has access.
To set access, click on the bar to the right of the menu item. Then check up to three boxes to select the officers.

If you want to remove all officers at once and make the area admin access only, click on the item at the top of the drop-down list.
Remember to SAVE when you have finished.
Important: Agenda Settings & Templates refers to the overall settings that affect how future agendas will look. Access to current agendas is a separate setting.
You can allow up to three officers to create new agendas and edit current ones, in addition to the site admin.
The Toastmaster of the current meeting, or other designated role-holder, has editing rights but cannot create new agendas.
Delegating Website Settings will not allow the officer(s) in question to access this Access Settings tab or the Administrator Info tab. These remain admin-only areas.

- Details
- Category: Documentation
- By Brian
Support Forum Rules
1) Please post your club number in every post, or add to your forum signature. The admins will often need your club number in order to investigate the problem. For information on how to edit your forum signature, see Getting help with your FreeToastHost site.
2) Please start a separate message thread for your problem. Every problem is different and if you hijack (= post at the end of) another's post they will get all the emails about your problem.
3) Please read the Documentation before posting. Many of the answers you are looking for are in there.
4) Please be patient. The volunteer Ambassadors are trying their best to help you. Currently, they don't all have access to the internal workings of the servers.
5) DO NOT PM* the volunteer ambassadors for help (unless you have been asked to, of course). You'll only be asked to post in the forums. Why not save time and just create that post.
6) Ensure that you abide by the forums' Terms of Use at all times.
7) Any spam, "adult" content or other objectionable messages will be deleted as soon as discovered and the users banned.
*PM = (send) private message
Updated 7/31/2015
More Articles …
Page 15 of 30


