


- Details
- Category: Documentation
-
 By Jane Atkinson
Treasurer and access to the Dues Module
The Dues module is a way for club treasurers to email dues invoices, keep track of who has paid, the payment method used, and to follow up with those who haven't paid yet.
It is NOT an accounting package, and does NOT link to TI member payment information.
The Treasurer and the website Admin have access to this module by default. Other officers can be given access to the module if the club wishes.
Access the module by selecting it from the members-only menu. A pop-up console will appear.
If you are the Admin, you'll find it at the bottom of the Admin console drop-down list.
Before you use the function for the first time, you need to customise it.
Step 1a - club information
You are asked to fill in some settings that apply to your club.
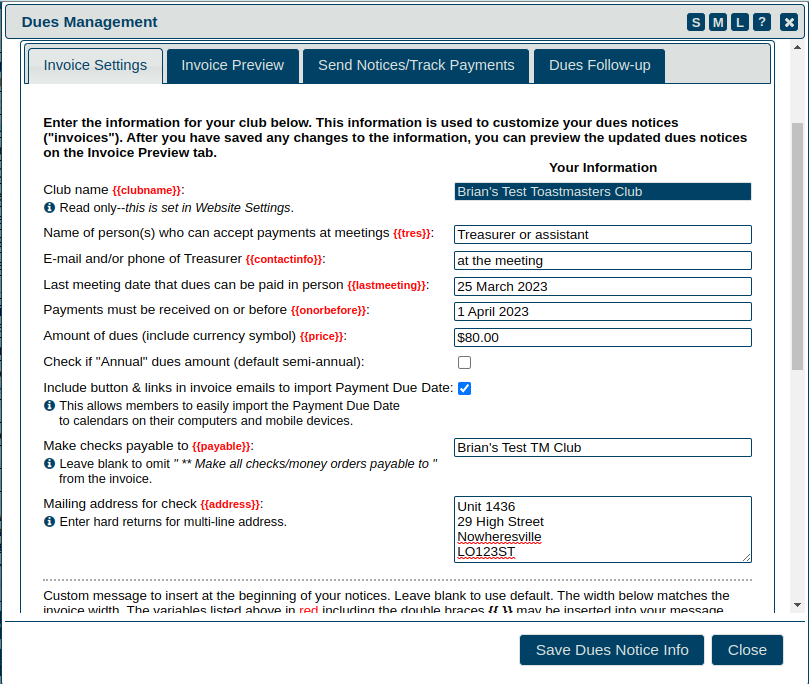
You have quite a bit of flexibility with the field contents. If you prefer a different style for the dates, such as March 28 2023 or 2023-03-28, you can use that. If you want the person who can accept checks to be "Mary, or in her absence, Mei", that will work as well.
If selected (as in the image above), the "Include button and links in invoice emails to import Payment Due Date" check box adds options for members to add the due date to their calendar. These appear at the end of the email (see screenshots later in this doc).
Step 1b - message body
Secondly, set up the body of your notices to read the way you want it to. If you use the variables in double braces, e.g. {{name}}, the values will be automatically inserted into the email when it's sent.
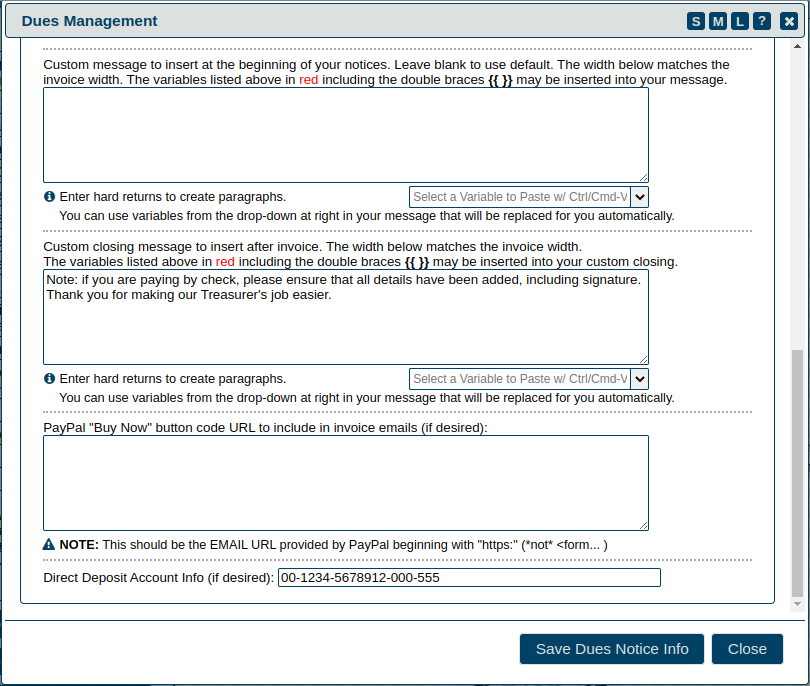
If you click on the "Select a Variable to Paste..." pull-down, you will see a wide choice of variables that you can include. Click on the one you want to use and then use Ctrl or Cmd-V (depending on your system) to paste it into the message body.
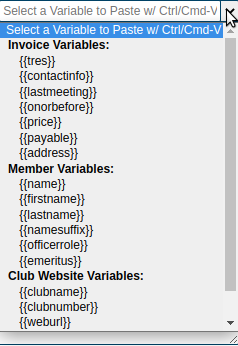
Note that the text doesn't automatically wrap. You need to use hard returns (hit the "Enter" key) to make the lines break where you want them to.
If you think you've made a complete mess of your message body, you can delete it, save, and the system will set it back to a sensible default. Then you can try again.
The custom message goes on the invoice, not in the message body. You can leave it blank if you wish.
If your club uses PayPal, you can insert the code that PayPal has given you into the box. Make sure that you paste the entire code. See the PayPal Button page for more details.
If you don't use PayPal, just leave the box blank and nothing will appear on the invoices. The same applies to Direct Deposit.
Step 2
Once everything is set up to your liking, click on the Save Dues Notice Info button at the bottom of the admin panel.
Step 3
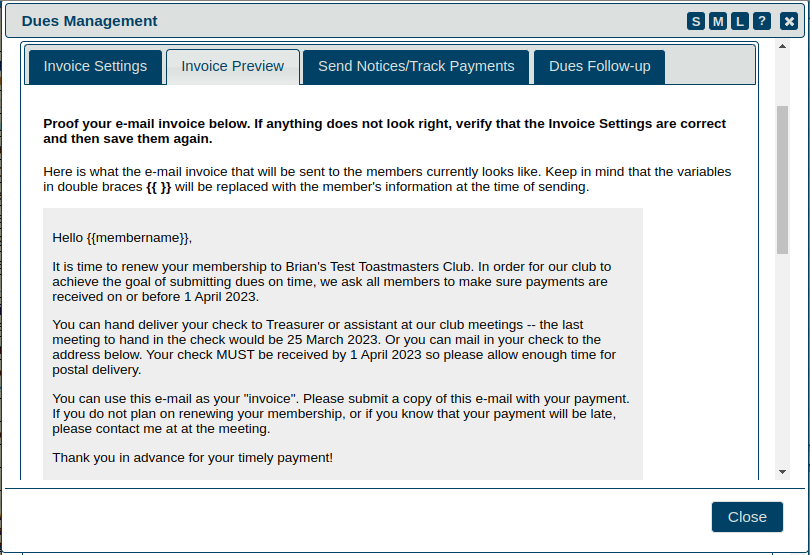
Now it's time to see if your message and invoice looks the way you want it to. Click on the Invoice Preview tab to view the message.
The first part is the message body. Remember that the member's name will automatically be inserted when the email is sent.
The second part is the invoice itself.
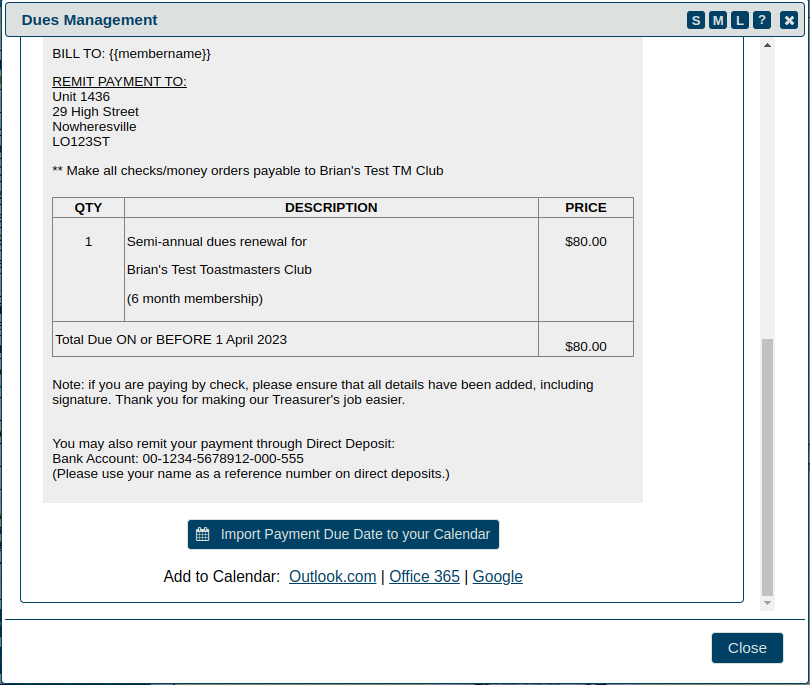
The large calendar button allows members to download a calendar (.ics) file. This is a small text file which they can then import into their device calendar. Alternatively, they can click on one of the named calendar links to add it directly to their online calendar account.
If you have checked the "Annual" amount box (see image 1), the invoice will be adjusted to show that.
IMPORTANT:You can go back to the Invoice Settings tab and make changes if you wish. If you do, you MUST save them before proceeding to the next step.
Step 4 - send emails
Now you can send your emails and keep track of who's paid. Click on the Send Notices/Track Payments tab.
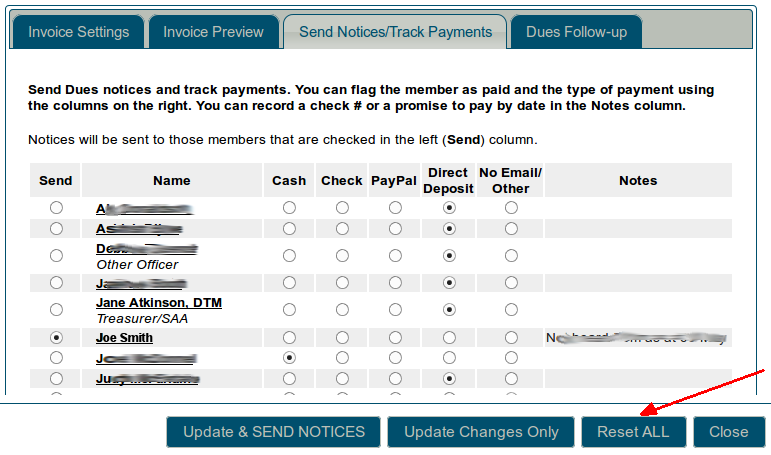
The module will ONLY send to members with the "Send" button active – Joe Smith in this instance. When you click on one of the buttons to the right (Cash, Check etc), that automatically clears the "Send" button for that member.
You would probably only use the Reset ALL button (marked with an arrow) when you start a new dues cycle. That clears all payment information and sets the module to send to everyone.
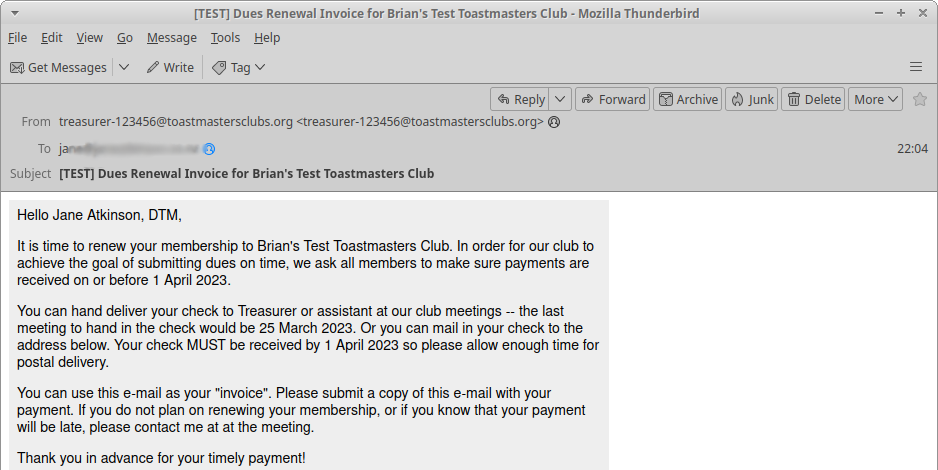
You can test your settings by sending an email to yourself.
Here's a sample final email:
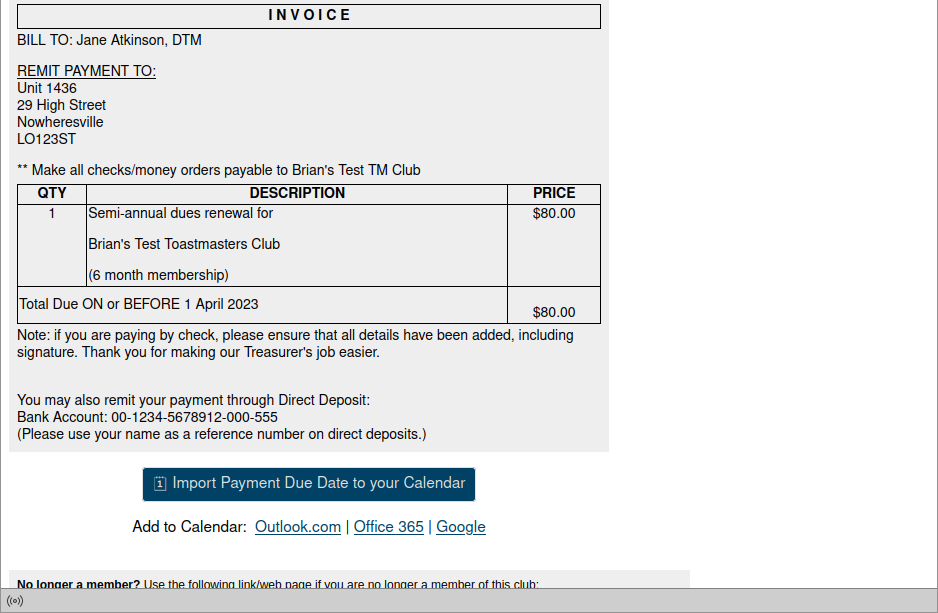
If you're happy with this, it's time to send the email to your members.
Step 5 - follow-up
You can view a printable report showing who has and hasn't paid. This is useful for taking to club meetings for following up in person.
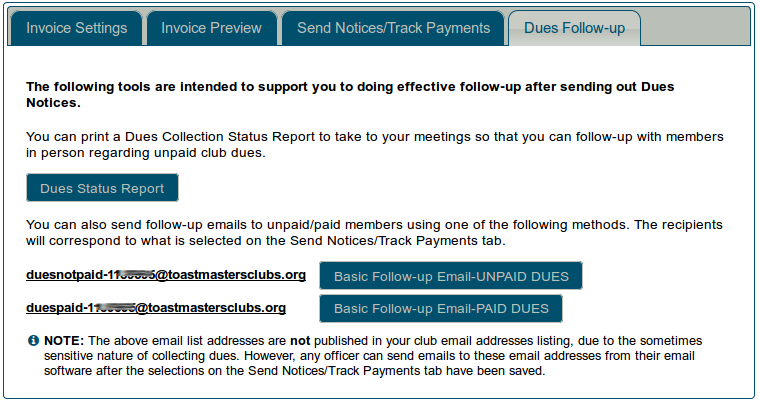
There are also two special group email addresses that you can use. These don't send the invoices again – just an email.
Clicking on one of the links (left side of the panel) will open a window in your email client.
Clicking on one of the buttons (right side of panel) will open a basic email window with the name(s) already added. You can't use CC or BCC, or add an attachment. If you need to do any of these things, use your regular email.
If you decide that you want to resend the invoice, use Step 4.
May you all be successful in collecting your dues on time and getting the DCP point for your club!
Updated 27 January 2023
- Details
- Category: Documentation
-
By Jane Atkinson
There are two areas where you can download files, Public Downloads and Member Downloads. Anyone can access the former, while the latter contains files that can only be accessed while logged in.
Officers may see additional files in the Member Downloads area that are only available for download by officers.
If the file you want is inside a folder, click on the folder icon to open it.
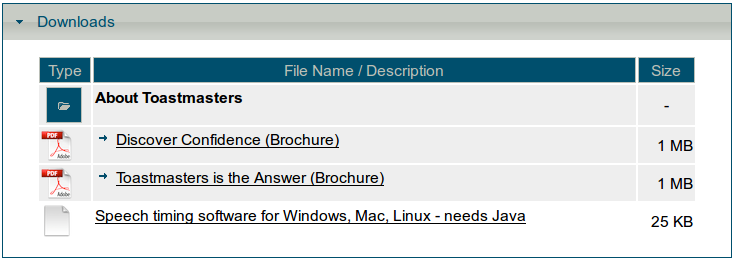
Click on the link for the file that you want to download. Then, when the server has retrieved the file details, click on the Download button.
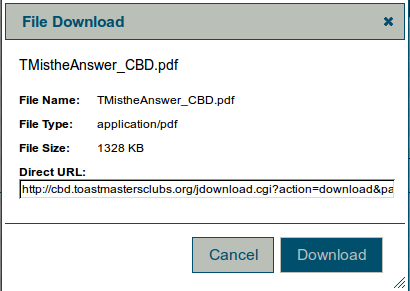
If the file is a pdf file, it will download. It won't open in your browser.
Members can't upload files, except for their own profile picture. If there's anything you want uploaded to your site, you'll need to talk to the site administrator.
In some clubs, a club officer may have been put in charge of file uploads. Talk to him/her, in that case.
- Details
- Category: Documentation
-
By Jane Atkinson
Adding / Removing Events in the Club Calendar
The club calendar is a shared calendar between the members and the website administrator, viewable by the general public. By default, the members are able to add events to the site and remove them. As a member, you can only delete your own events; you are not technically able to remove events you did not create. However, the administrator of the site can remove any event.
Consult your club officers about your club's policy on adding and removing events. Some clubs might limit the types of events members can add, while some clubs might make it a policy that members cannot add events. Again, while technically you, as a member, can add events, it might be against your club's policy to do so.
If you're not using the Calendar and Agenda at all, it's a good idea to hide the Club Calendar menu link (see the Appearance tab in the admin console). An empty calendar doesn't look very appealing.
Types of Events You Might Want To Add
As a member, here are some suggestions as to what you might want to add to the calendar:
- any speeches you may be giving outside your club
- book signings
- events that your fellow members might be interested in attending
- speaking related workshops or events
- charity events you are involved in
Meeting agendas
Note: Events marked in Blue are linked to FreeToastHost meeting agendas. They can only be added by creating a meeting agenda, and they will always be called Club Meeting . You cannot create these directly in the calendar.
If a logged-in member clicks on a Club Meeting event, they will be redirected to the agenda. If a member of the public clicks on an agenda item, they will be redirected to the Meeting Information / Directions page. Make sure that this page is up to date and easy to understand.
Adding an All-day Event
You can add an event simply by clicking on the day you want to add the event. This will add a full day event. A window will appear that will prompt you for more information:

The event name will appear in the listing, the URL will be linked to the listing, and the recurring event will set up exactly one year's worth of events (if you want more, create more recurring events at the end of the one year period).
Depending on your web browser, sometimes the event might not automatically appear after you add them. You may need to refresh your browser to see them.
Removing an Event
Simply click on the event. When you are the owner of the event, you will NOT be taken to the URL if you linked it to a URL – at least not while you are still logged in. If you log out, then click your event, you will be taken to the URL, if you assigned one. Clicking on the event, while logged in as the user who created the event, causes the delete confirmation window to pop up.


If you are removing a recurring event, and you click on any one of the entries except for the first one, you will have the option to delete them all, all after that event, or just that single event.

Adding an Event at a Specific Time of Day
Click on the "Week" or "Day" view, click the start time and drag your mouse to the event end time. Then follow the process above.

The time 12 to 3 pm on Saturday has been selected.
About Time Zones: The calendar works off your local time zone, and displays the events according to the time on your local computer. So if you travel across time zones then change your computer to the new time zone, the times will appear different as well, since they are referring to an absolute point in time.
More Articles …
Page 27 of 29
Latest Forum Posts
-
- Club 1104 - who do I ask to fix the inaccurate rec...
- In Public Forums / FTH4 Support
- 47 minutes ago
-
- Modify or hide small club name between "Banne...
- In Public Forums / FTH4 Support
- 1 hour 56 minutes ago
-
- Club No. 1250 - Need to Edit our Club's Website
- In Public Forums / FTH4 Support
- 2 hours 29 minutes ago
-
- Club #6494 - Cedarbrae
- In Public Forums / FTH4 Support
- 2 hours 31 minutes ago
-
- The Admin-Entered Attendance (absent or excused) n...
- In Public Forums / FTH4 Support
- 4 hours 37 minutes ago