

- Details
- Category: Documentation
-
 By Jane Atkinson
Treasurer and access to the Dues Module
The Dues module is a way for club treasurers to email dues invoices, keep track of who has paid, the payment method used, and to follow up with those who haven't paid yet.
It is NOT an accounting package, and does NOT link to TI member payment information.
The Treasurer and the website Admin have access to this module by default. Other officers can be given access to the module if the club wishes.
Access the module by selecting it from the members-only menu. A pop-up console will appear.
If you are the Admin, you'll find it at the bottom of the Admin console drop-down list.
Before you use the function for the first time, you need to customise it.
Step 1a - club information
You are asked to fill in some settings that apply to your club.

You have quite a bit of flexibility with the field contents. If you prefer a different style for the dates, such as March 28 2023 or 2023-03-28, you can use that. If you want the person who can accept checks to be "Mary, or in her absence, Mei", that will work as well.
If selected (as in the image above), the "Include button and links in invoice emails to import Payment Due Date" check box adds options for members to add the due date to their calendar. These appear at the end of the email (see screenshots later in this doc).
Step 1b - message body
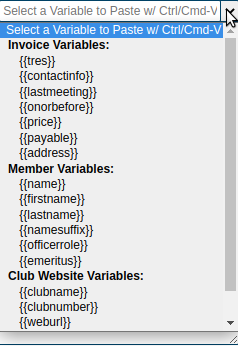
Secondly, set up the body of your notices to read the way you want it to. If you use the variables in double braces, e.g. {{name}}, the values will be automatically inserted into the email when it's sent.

If you click on the "Select a Variable to Paste..." pull-down, you will see a wide choice of variables that you can include. Click on the one you want to use and then use Ctrl or Cmd-V (depending on your system) to paste it into the message body.
Note that the text doesn't automatically wrap. You need to use hard returns (hit the "Enter" key) to make the lines break where you want them to.
If you think you've made a complete mess of your message body, you can delete it, save, and the system will set it back to a sensible default. Then you can try again.
The custom message goes on the invoice, not in the message body. You can leave it blank if you wish.
If your club uses PayPal, you can insert the code that PayPal has given you into the box. Make sure that you paste the entire code. See the PayPal Button page for more details.
If you don't use PayPal, just leave the box blank and nothing will appear on the invoices. The same applies to Direct Deposit.
Step 2
Once everything is set up to your liking, click on the Save Dues Notice Info button at the bottom of the admin panel.
Step 3
Now it's time to see if your message and invoice looks the way you want it to. Click on the Invoice Preview tab to view the message.
The first part is the message body. Remember that the member's name will automatically be inserted when the email is sent.

The second part is the invoice itself.

The large calendar button allows members to download a calendar (.ics) file. This is a small text file which they can then import into their device calendar. Alternatively, they can click on one of the named calendar links to add it directly to their online calendar account.
If you have checked the "Annual" amount box (see image 1), the invoice will be adjusted to show that.
IMPORTANT:You can go back to the Invoice Settings tab and make changes if you wish. If you do, you MUST save them before proceeding to the next step.
Step 4 - send emails
Now you can send your emails and keep track of who's paid. Click on the Send Notices/Track Payments tab.

The module will ONLY send to members with the "Send" button active – Joe Smith in this instance. When you click on one of the buttons to the right (Cash, Check etc), that automatically clears the "Send" button for that member.
You would probably only use the Reset ALL button (marked with an arrow) when you start a new dues cycle. That clears all payment information and sets the module to send to everyone.
You can test your settings by sending an email to yourself.
Here's a sample final email:


If you're happy with this, it's time to send the email to your members.
Step 5 - follow-up
You can view a printable report showing who has and hasn't paid. This is useful for taking to club meetings for following up in person.

There are also two special group email addresses that you can use. These don't send the invoices again – just an email.
Clicking on one of the links (left side of the panel) will open a window in your email client.
Clicking on one of the buttons (right side of panel) will open a basic email window with the name(s) already added. You can't use CC or BCC, or add an attachment. If you need to do any of these things, use your regular email.
If you decide that you want to resend the invoice, use Step 4.
May you all be successful in collecting your dues on time and getting the DCP point for your club!
Updated 27 January 2023
- Details
- Category: Documentation
-
By RogerM
How to take and upload a screen capture to the FreeToastHost support forums.
- It is frequently helpful to see what a user is seeing on their screen when trying to help them resolve a problem with their website. This article describes how to capture your screen to a file, then upload it as an attachment to a support forum message.
- In Microsoft Windows, there is a great accessory included called the Snipping Tool (now called "Snip & Sketch") that greatly simplifies taking screen captures from part of the screen. Read here for details on this: MS Windows Snipping Tool
- If you are using an Apple computer, the basic instructions for taking a screen capture are here. The general process is to capture the screen, then paste the captured image into an image editor (like the Apple Photos app, MS Paint, or similar), crop the image to the desired size, then save the image to a file in a location that you can remember and retrieve from below (in Step #6).
- If you are using an Apple computer, the basic instructions for taking a screen capture are here. The general process is to capture the screen, then paste the captured image into an image editor (like the Apple Photos app, MS Paint, or similar), crop the image to the desired size, then save the image to a file in a location that you can remember and retrieve from below (in Step #6).
- In MS Windows, you can activate the Snip & Sketch capture menu by pressing the Windows + Shift + S keys at the same time. You should then see a menu at the top of your screen that will allow you to select the part of the screen to capture.
- Once you have selected the desired part of the screen, the Snip and Sketch program should open with the captured screen image loaded to allow you to annotate and/or crop the image. In the image below, the crop icon is circled in red.

- Once you have finished modifying the captured image, save it using the save icon (circled in blue above). Save the resulting picture as a jpeg file, with a meaningful name, noting where it is saved to. If you have a difficult time following the folders, save it to your desktop.
- Log in to the FTH2 support forum.
- Click on new topic, and enter the subject of your problem or question.
- Enter the message, making sure you have also supplied your club number.
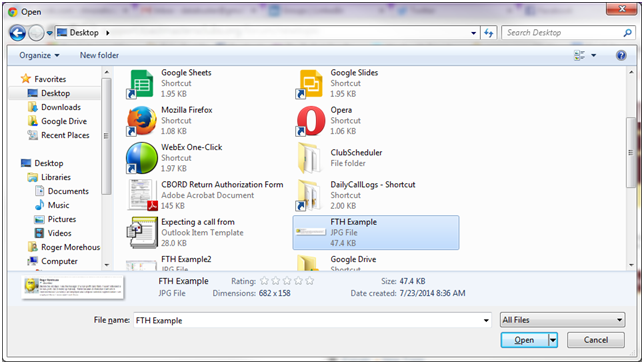
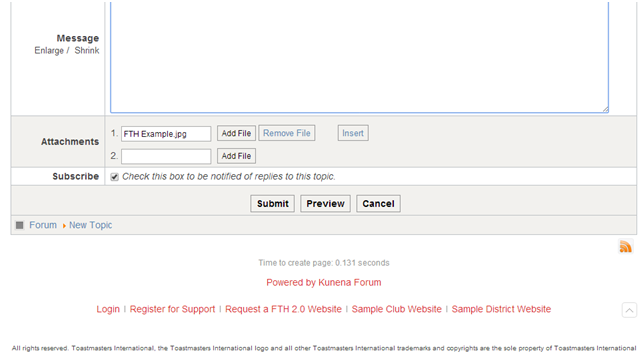
- Below the message field is a button named Add File. Click on the Add File button. Navigate to the folder (or desktop) where you saved the picture. Click the file name and then click the Open button.
- The file name will now be listed in the attachments.
- Click the Submit button.
Search Keywords: Screen Shot, screenshot, Screen Capture, attachments, Paint, Paintbrush, troubleshooting
- Details
- Category: Documentation
-
By Jane Atkinson
Email addresses that can be used for emailing club members and officers.
You can't send FROM these addresses, so use something else if you may need to send from an email address to prove who you are. Some social media sites require you to do this.
Club Email Lists available with FreeToastHost
To see the email lists and aliases available for your club, click on "Club E-mail Addresses" in the Members only menu once you are logged in.

To send emails to a list, you must be a member and, in some cases, an officer.
In all email addresses shown below, replace "nnnn" with your club number.
If the text is too small in the chart below, you can use your browser's zoom to make it more readable.

Members may send email to:
This email address is being protected from spambots. You need JavaScript enabled to view it. This email address is being protected from spambots. You need JavaScript enabled to view it. This email address is being protected from spambots. You need JavaScript enabled to view it. This email address is being protected from spambots. You need JavaScript enabled to view it.
In addition, they may send to any custom email groups that have been set up for members.
Officers may also send email to the following groups:
This email address is being protected from spambots. You need JavaScript enabled to view it. This email address is being protected from spambots. You need JavaScript enabled to view it. This email address is being protected from spambots. You need JavaScript enabled to view it. This email address is being protected from spambots. You need JavaScript enabled to view it.
These four groups, and any custom groups based on them, may NOT be used by members.
Individual officer and other aliases
There are eight officer email aliases and two other aliases which are listed below.
nnnn is replaced by your club number.
This email address is being protected from spambots. You need JavaScript enabled to view it. This email address is being protected from spambots. You need JavaScript enabled to view it. This email address is being protected from spambots. You need JavaScript enabled to view it. This email address is being protected from spambots. You need JavaScript enabled to view it. This email address is being protected from spambots. You need JavaScript enabled to view it. This email address is being protected from spambots. You need JavaScript enabled to view it. This email address is being protected from spambots. You need JavaScript enabled to view it. This email address is being protected from spambots. You need JavaScript enabled to view it.
This email address is being protected from spambots. You need JavaScript enabled to view it. This email address is being protected from spambots. You need JavaScript enabled to view it.
In addition, the club may have other special email aliases. Ask your admin for details of those.
Anyone (including non-members) can send to these email addresses. Emails to them are then automatically forwarded to the person defined on the website. The recipient's real email address is NOT disclosed until that person replies to the email.
Any of the above officer and contact-nnnn email addresses can be disabled if they been a magnet for spam. The only exception is the
More Articles …
Page 7 of 30