

- Details
- Category: Documentation
-
 By Jane Atkinson
 - Hits: 14643
Editing an existing agenda
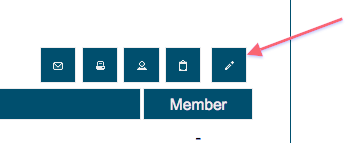
To edit an agenda, click on the pencil icon in the row of icons near the top of the agenda window.
The edit agenda area has three tabs: Agenda Setup, Meeting Description and Meeting Agenda Items.
Agenda Setup
This allows you to change the agenda date and start time. In most cases, you can leave these settings as they are.
Set a Meeting Venue
This is an optional feature that you can use if your club meets in varying locations. You can set a Meeting Venue from the drop-down or create a new Meeting Venue. See the following for more details on this feature: https://support.toastmastersclubs.org/doc/item/meeting-venues.
Set a Calendar Label

Save this agenda as an Agenda Template
The admin or other designated officer can use this option when creating agenda templates. It doesn't do anything unless you have meeting agenda settings access. (Admin and usually VP Ed.)
Meeting Description
This contains a standard edit window as seen in many other parts of the admin panel.
The agenda header appears across the top of the agenda when displayed on the site, when emailed and when printed.
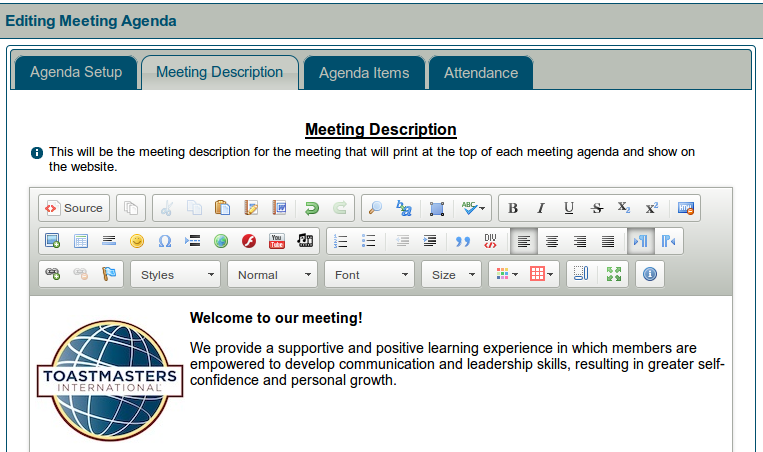
Usually, a default has already been set up. You may want to add a theme name and/or additional graphics.
Before editing this area, check with your VP Ed to clarify club policy about changing the header.
Meeting Agenda Items
The following instructions also apply to existing agenda templates. Access templates through the admin console.
Assigning Names to Roles
If you are working with an existing standard agenda, this may be the only section you need to be concerned with.
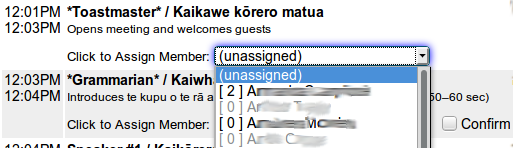
Choose the member's name from the pull-down menu.
If a member has answered "No" for "Are you planning to attend this meeting?", the name will be greyed-out in the list and can't be selected.
Save.
To show the role as unfilled, choose "(unassigned)" from the pull-down menu, and save.
The numbers in square brackets are the number of times the member has performed this role. How accurate this is depends on whether the agendas are reconciled after meetings.
When you close the edit window, the screen will refresh and the names on the agenda will be updated.
Edit role
Click on the pencil icon to the right of the agenda timing.

You will be shown the Add/Edit Item area at the bottom of the panel, with the role details in it.
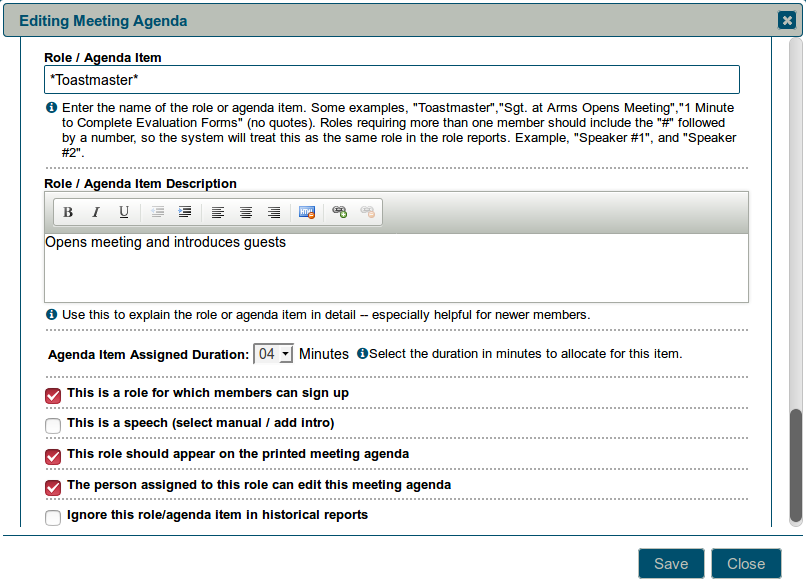
Role / Agenda Item Description
A description of the role or item can be particularly useful for new members and guests.
You can use bold, italics and line breaks in this field.
Role Settings
There are five settings:
- Roles to which members can sign up. If this is checked, a sign-up button will appear for the role on the sign-up screen and the role will be included on the printed Meeting Sign-Up Sheet.
- Speech. If this is checked, the speech details boxes will appear in the finished menu.
- Printed role. Leave this UNchecked if you want an item to appear on the website or email agenda only.
- Typical uses for UNchecking this are to establish backup speakers, meeting set-up roles, and to allow recording votes (after the meeting) for Best Speakers, Best Evaluators, Best Table Topics, etc.
Problems with items failing to print, or members being unable to sign up, are often caused by not setting these boxes correctly.
- The person assigned to this role can edit the agenda.
Usually, this will be the Toastmaster, Chair of the meeting or Club President. This setting can also be used with a one-off role such as Chief Judge. In addition, it will be helpful to clubs defining roles in languages other than English. - If you're setting up a new agenda or template and enter a role name such as Toastmaster, you'll be asked if you want the person in this role to be able to edit the agenda.
- Ignore this role / agenda item in historical reports.
This is particularly useful where an agenda item is used for announcements, "cannot attend" notices or other items that aren't really a meeting role. It can also be used for occasional roles such as Chief Judge.
Assigned Duration
Select the duration of the role (in minutes) from the pull-down menu.
Roles with a duration of 0 mins do not display a time on the agenda. They are useful for comments or for roles which have no particular agenda slot (person who provides refreshments, perhaps).
Remember to SAVE when you have finished.
Note: Names of existing roles can be edited. However, if you do this, the new name will count as a new role, even if it is only changed by a letter or two.
If you want the changed role name to be used in future, make sure that the agenda template gets edited as well.
Change role order
Agenda item order is changed by dragging and dropping the role or item.
To do this, place the mouse pointer over the role that you want to move. You'll see it change to a double-headed arrow.
Left click and hold, and drag the item to where you want it, and release. The times will be recalculated automatically.
Delete role
Click on the trash icon alongside the item you wish to delete.

Add role
To create a new role, go to the bottom of the page to the Add/Edit Role area.
-
Add the name of the role to the role title field.
-
Add a description if desired.
-
Set the role type as described above.
-
Define the duration.
-
Save.
-
Move the new role to the correct position in the agenda.
Repeated and grouped roles
There are two special types of agenda roles: ones where the same role with the same person appears several times on the agenda; and roles that we want to group together when creating reports.
Repeated roles
When we give someone a role such as Grammarian or Toastmaster, we may want it to appear more than once on the agenda. We also want the same person to have this role every time it appears, without having to sign up (or be assigned) more than once.
For example:
| Grammarian introduces word of the day | John Smith |
| … | |
| Grammarian's report | John Smith |
To define a repeated role, put an asterisk (*) before and after each occurrence of the role name, including the first one. Make sure that the role name is spelled the same way each time it occurs.
*Grammarian* introduces word of the day
*Grammarian*'s report
If it's a role to which members can sign up, check the "This is a role for which members can sign up" button on the first occurrence only.
It will still work if you have more than one occurrence defined as a sign-up role, but it may be confusing to members to see more than one "sign up" button.
If you don't want a member to be able to sign up, make sure that this is turned off in all occurrences of the role.
When you've completed editing the agenda or template, you'll notice that only the first occurrence of the role has a pull-down menu for selecting a member.

When a logged-in member clicks to sign up, they will see their name alongside that occurrence but not the others. Once the page has been refreshed, it will have propagated to the other occurrences on the agenda.
Points to check
The role must be spelled exactly the same way each time. If you're using an apostrophe in an occurrence, put the asterisk before the apostrophe.
If it's not a member signup role, no occurrences should be marked as a member sign-up role.
Grouped roles
Important:
This function currently works only with Excel reports. It does NOT work with html reports, which still report the roles separately.
When you are doing a role report, you are probably more interested in how many times a member has been a speaker or an evaluator. How often the member has specifically been speaker #1 or evaluator #3 is usually not very important.
Grouped roles of this kind are defined by using the # symbol after the role name. On the agenda, they would appear as Speaker #1, Speaker #2, Speaker #3.

When the role report is run, the system looks at the word just before the # symbol and treats all occurrences of it as a single meeting role.
Attendance tracking
All the responses to "Are you planning to attend this meeting?", either from emails or directly in the online agenda, are stored here.

If a member can't respond by email or online, you can set the response yourself by clicking on the appropriate radio button. Be aware that if you mark someone as not attending, they will be removed from any roles that they currently hold for this meeting.
Remember to save when you've finished.
Editing Meeting Notes
Occasionally, a member's Meeting Note may need to be added, edited or removed; possibly because they don't have internet access.
Choose the member's name from the "Select a Member" pull-down (see below). Add, edit or delete the text in the usual way, then click on "Update Meeting Notes".

Linking Attachments to the Agenda
Uploaded files such as meeting minutes can be linked to an agenda as an attachment. You may also wish to link other types of documents to a meeting agenda such as a promotional flyer. You can change the file information (e.g. file description) for files that have already been linked via the buttons with the document icons on them (see below). Additionally, files that have already been linked can be deleted or un-linked from the agenda.

Note: The above buttons are only visible for officers that have agenda creation rights (e.g., VPE) assigned them in the Admin Console and those members who have signed up for a meeting role that gives them editing rights. Other members will only be able to download / view attachments that have already been linked to the agenda.
Use the Upload Files button if you need to upload the file before attaching it. A file that's already in the uploads area (e.g. via the File Manager) can be linked with the Link Existing Files button:

- Details
- Category: Documentation
-
By Jane Atkinson
- Hits: 9058
Creating an Agenda
Admin and, usually, VP Ed
You can create an agenda using a template or an existing agenda as the basis, or you can build it from scratch. Usually, the former method is preferred.
Click on the + icon in the agenda task bar near the top.
Choose a date
Choose a template. You'll be asked if you want to update the start time to the time associated with the template. Click YES or NO, whichever is appropriate.
If your club meets in varying locations and is using the Meeting Venues feature, then enter or select a Meeting Venue. For more information on this feature, see https://support.toastmastersclubs.org/doc/item/meeting-venues.
SAVE the agenda. Now you can begin editing it.
If you want to build the agenda from scratch, don't choose a template but do set the start time. Make sure that you add at least one item in the Meeting Agenda Items tab before you save and close the window, otherwise the agenda will disappear.
From here on, the procedure is the same as for editing an existing agenda. See editing an agenda for details.
- Details
- Category: Documentation
-
By Jane Atkinson
- Hits: 14067
Using the agenda
The agenda system is designed to let you add and remove yourself from roles, provide speech information and add meeting notes
Just because it is technically possible to do this, might not mean that your club operates this way. Some clubs still prefer to have the VPED, or other officer, take care of all the role assignments. Be sure to check with your club officers on your club's policy.
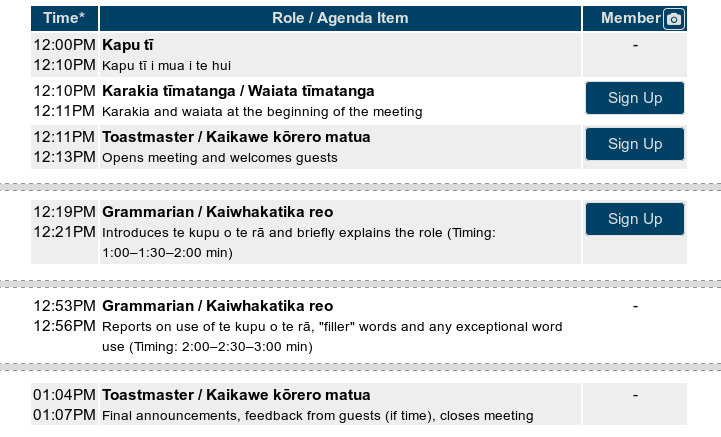
After logging in, click on the Agenda link. This shows the next agenda, or in some cases, today's agenda.
To go to another agenda, choose the date from the pull-down menu. You can also use the left and right arrow buttons to load the prior meeting agenda or the next meeting agenda, respectively.
Note: only agendas from the last 5 meetings are shown, by default. (depending on how the website is configured) If you want to access an earlier agenda, either click on the "List All Agendas" box, or use the club calendar to find the agenda that you want and then click on it.
Signing up for a role
Click on the Sign Up button on the right-hand side of the agenda. You may need to refresh the page to see the change fully.

If you've signed up as Toastmaster or Chairman, or if you are VP Ed or club President, you'll get a different view of the agenda once you've refreshed the page. See editing the agenda for additional details.
Removing your name from a role
Click on the [ X ] to the right of your name. You may need to refresh the page to see the changes fully.

Depending on how the website has been set up, your mentor, VP Ed or Toastmaster may automatically be notified.
Adding speech details
Important: The system will require that you sign up for a speaker role before you add speech details.
Choose your speech project (manual and project number) from the pull-down menu. The pull-down menu contains a filter feature that allows you to type in a few letters to search for your speech project. If you select a PATHWAYS project from the pull-down menu, two buttons will appear (Project Description and Evaluation Form) that will allow you to view and print the project resource PDFs for the project you selected.
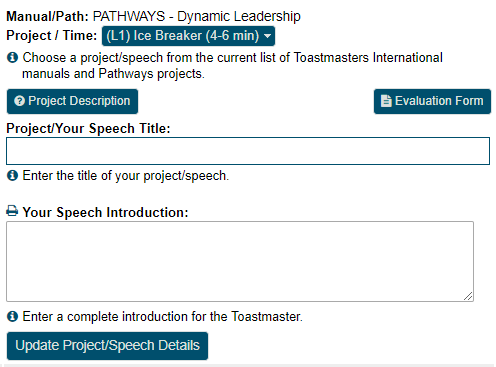
Add a speech title and an introduction. The title is visible to everyone, but only the VPEd, Toastmaster, admin and President/chairman can see the introduction.
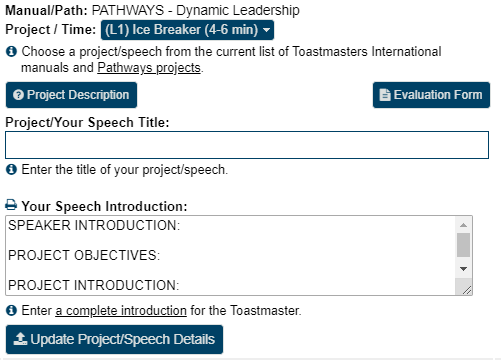
If the speech introduction box already contains text, it is likely that your club has defined guidelines for a good speech introduction or a template for you to follow. If you are uncertain how to follow your club's guidelines for a good speech introduction, consult with your club's VPEd. The following is an example of what you might see if your club is using a speech introduction template--your club may elect not to use this or may define different text.
After you have added your speech details, be sure to click on Update Speech Details to save them. You can also come back later and make updates.
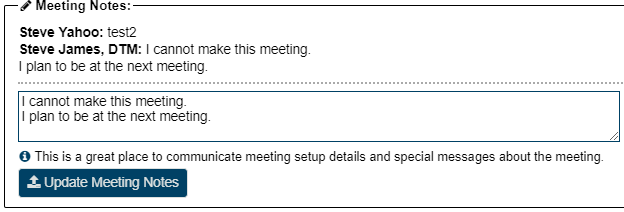
Adding and editing meeting notes
Meeting notes allows you to leave brief comments, for example, that you're unable to attend the meeting.
Remember to save/update the note after adding or editing it.
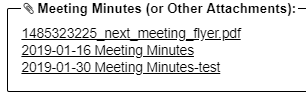
Meeting minutes (or other attachments)
You may see one or more links at the bottom of the agenda screen in a section entitled Meeting Minutes (or Other Attachments). These are links to files associated with the displayed agenda or meeting that you can click to download. The files have been uploaded to the server by the Toastmaster, VPE, or Club President. Typically, these would be links to Meeting Minutes that would be uploaded and show up after a meeting. However, you may also see links to other types of files before a meeting, such as special meeting flyers.
Emailing someone on the agenda
Click on the small envelope just to the left of "role filled by" and the person's name.
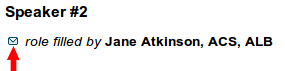
A pop-up will display that will allow you to choose to send an email via the internal email editor or your email client. The selected email editor will open with the person's address already in the address bar. This can be useful when you need to check something with one of the participants (e.g. a speaker whom you are going to evaluate).
Confirming Roles and Attendance
There are two areas where you can confirm your participation in a meeting. This can make the VP Ed's and Toastmaster/Chair's job easier.

The first is the pull-down list near the top of the agenda, just below the row of buttons. When you make your selection, the online agenda will automatically save your setting. You can change your setting later if you need to.
If you set this to "No", anyone editing the agenda will not be able to assign you to role.
If you use a signup button to take a role, attendance will automatically be set to "Yes".

Secondly, you can confirm your assigned role by clicking on the "Confirm" button below your name (or photo).
You can't remove a role confirmation. You need to remove yourself from the role entirely.
- Details
- Category: Documentation
-
By Jane Atkinson
- Hits: 8647
The Custom pages area allows you to create and edit additional pages. You may have as many of them as you wish.
To go there, choose Custom Web Pages from the main pull-down menu.
You are shown the screen for creating a new page, with an edit window and a number of fields to fill in. To edit an existing page, select the page from the pull-down menu.
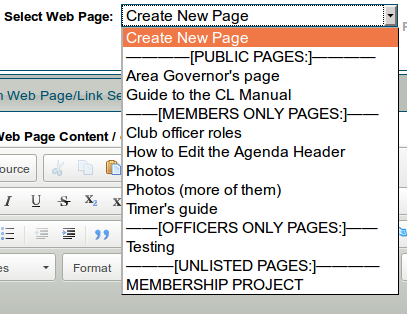
If you haven't created any custom pages yet, you'll see nothing in this list except "Create New Page". Just start typing in the Edit window to add content, and fill in the other details as noted below before saving your first page.
Edit window
This is a WYSIWYG editor like a word processor. Add your content here.
(If you want to create a link, see adding links to other sites.)
For more details on creating and editing pages, see adding and editing content
Web Page Tools are for backing up and restoring text, replacing and rotating images, and checking for bad links. See Backing up custom content and Adding and Editing Page Content for details.
Page details
Your page or link needs a few details so that it can be found on the internet. The following fields allow you to add these.
Web Page Title / or Link Title
Is the name that shows in the browser window bar and also in the menu listing.
Menu Position #
This lets you have custom pages in a different order than alphabetical. The larger the number, the further down the list the menu entry appears.
Relocate this Web Page's Menu Entry
This is another way to relocate the menu position of a page quickly.

You can choose top of the menu, or before/after a specific page. You can also reset the menu ordering to alphabetical order.
Web Page Name
Is the URL or address of the page (what you would type in your browser to go to the page). It will end in html
Leave this blank if you're creating a link.
Important:
The following page names are reserved by the system for its own use. DO NOT USE THEM.
- directions.html
- meetourmembers.html
- calendar.html
- member_downloads.html
- downloads.html
- unsubscribe.html
- agenda.html
- agenda-######.html (where ##### is some number)
- agenda-new.html
Web Page Description
When a person searches for the page in a search engine, this description is what they'll see. Therefore, make sure that it's accurate, easy to read and interesting.
Leave this blank if you're creating a link.
Web Page Keywords
Individual words or brief phrases that relate to the page. This field is much less important than the Description, and some search engines ignore it altogether.
Leave this blank if you're creating a link.
Web Page Reference Notes
Use this area to make notes about things that the next administrator may need to know, such as where you got a picture from, how you embedded a video, and so on.
Page Type
This setting determines which menu your page appears in and who can access it.

There are four choices.
-
Public - accessible to anyone.
-
Members only - accessible to members only, but the link can be seen by anyone.
-
Officer only - accessible only to officers and the link is visible (in the Members Only menu) only to a logged-in officer.
-
Unlisted access - the link doesn't appear in any menu. Note that it doesn't mean non-accessible. If someone knows or guesses the link, they can still access the page.
In other words, it is NOT secure.
Page type can be changed at any time.
Appearance
To access this, click on the Appearance tab near the top of the frame.
Here you can change the background colour of the page. See Appearance for details of how to do this.
- Details
- Category: Documentation
-
By Jane Atkinson
- Hits: 4389
How to retrieve content from Google cache
(Also works with Bing cache)
If you've deleted a page, or overwritten its content, and don't have a backup, you may still be able to get the content back, especially if you've only just made the error.
When Google crawls the internet looking for content to index, it takes snapshots of pages which it stores on its servers. These show what the pages were like on the date of Google's visit.
To access this snapshot of your page, enter the page's name in the Google search box.
You can do this in any browser, not just Google Chrome.
Now look for the page's entry in the search results.
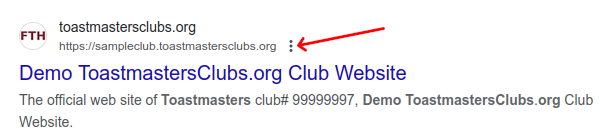
Just to the right of the name is a line of three dots (arrowed).
Click on that. You will get a popup screen with a button labelled "Cached" at the bottom right-hand corner.
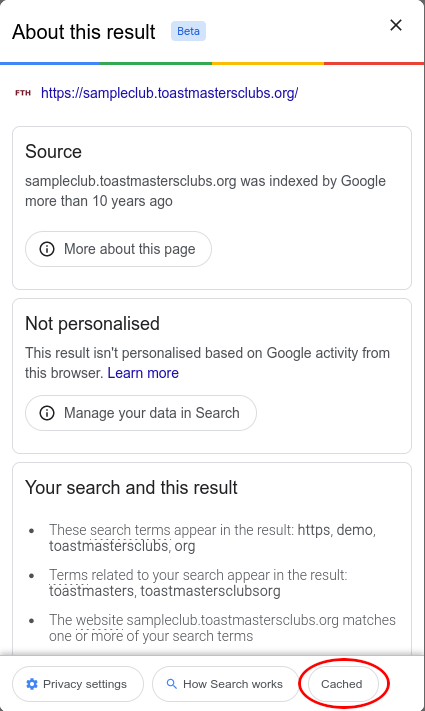
Click on the word "Cached" and you'll get a copy of your page. The header at the top gives the date when the page was cached. With luck, it has the content that you want to recover.
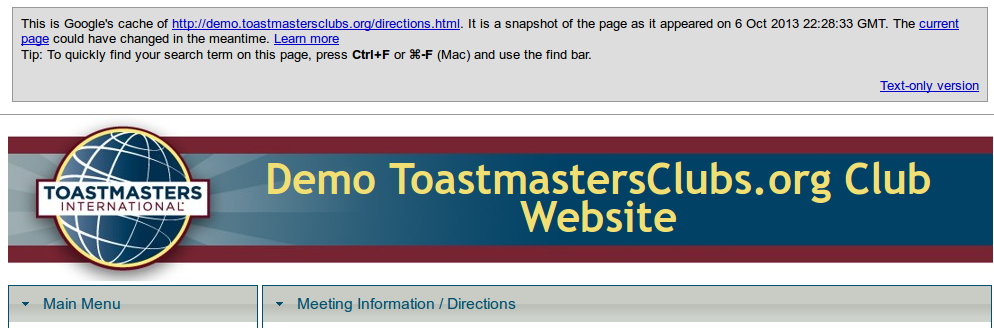
If it's there, you can copy it and add it back into your page.

Select the text and copy.
Open the admin console of your site, choose the page you want to recover and paste the text in.

You may need to insert the images again, but these should still be on the server.
Save, and breathe a sigh of relief.
Other Available Caches and Archives
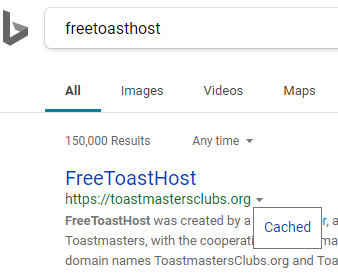
If you cannot recover your content from Google Cache, you may still be able to recover it elsewhere.
Bing also caches web pages as it crawls and indexes websites.
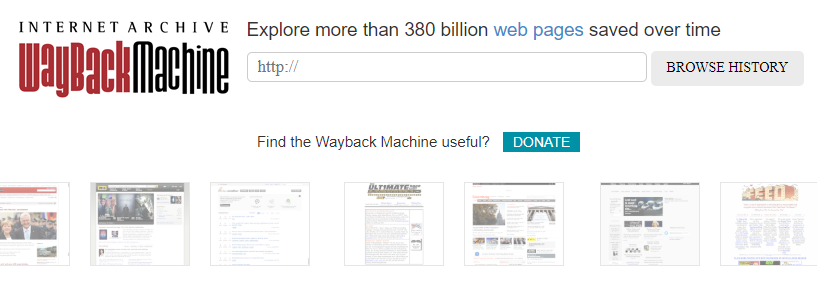
Lastly, there is the independent, non-profit Internet Archive that maintains past web pages for every website that are accessible through their "Wayback Machine" website, https://archive.org/web/.
Remember that a backup is still the best way of making sure you don't lose your page content.
More Articles …
Page 7 of 9