

- Details
- Category: Documentation
-
 By Steve James
 - Hits: 6089
Click on the email (envelope) link in the agenda button bar.

A subject which includes the agenda date will be proposed for the email, but it can be edited if you wish.
You can also include a personal message along with the agenda. Compose this in the edit window.
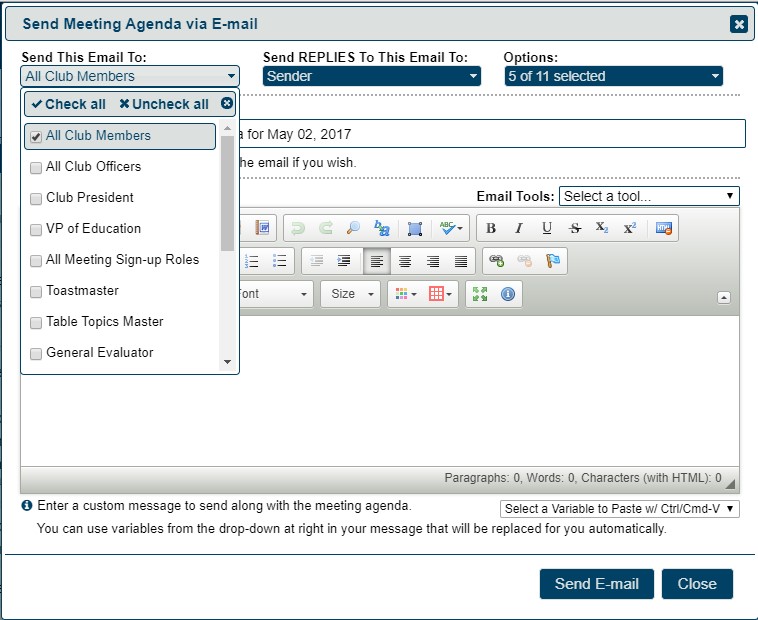
Choose recipients (first pull-down menu). The system remembers your choices but you can change them at any time.
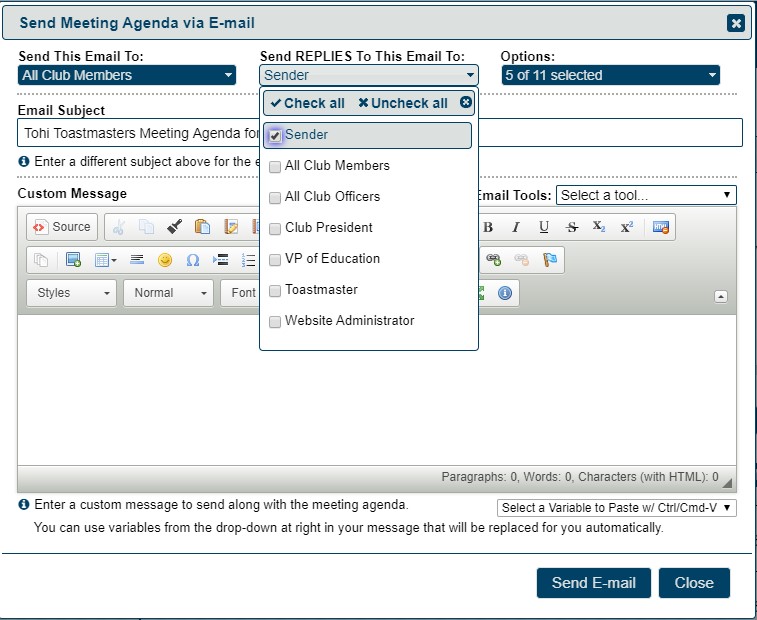
Choose who your replies go to. Before you use "All Club Members", check with your club that they are happy with this.
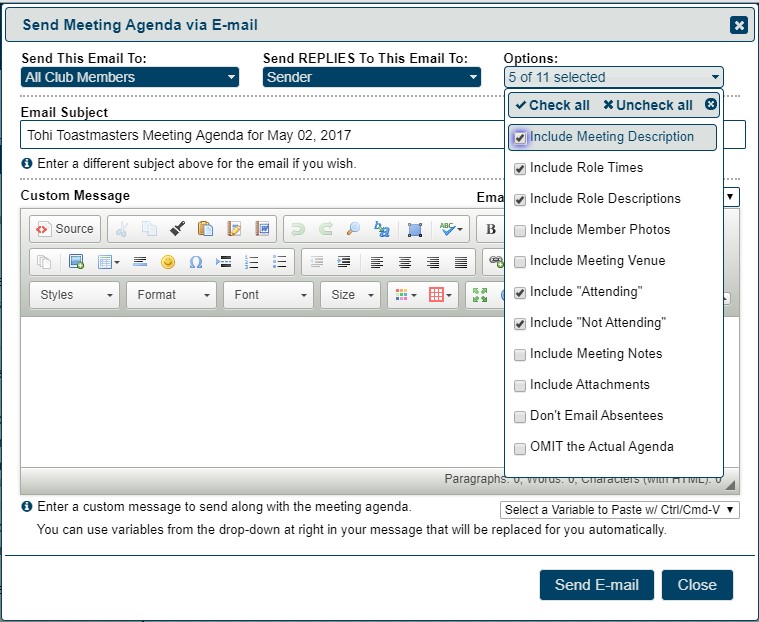
Select options. This determines what goes in the agenda email.
OMIT the actual agenda is useful for following up – you usually don't need to send the whole agenda again.
Selecting Include "Attending" and / or Include "Not Attending" prints a summary of those who have confirmed that they are (or are not) attending.

FreeToastHost inserts buttons and links in your agenda email to allow recipients to "respond" to the email. For instance, this lets them sign up for meeting roles right from the emailed agenda. To learn how these "Response Links" in an emailed agenda work, see http://support.toastmastersclubs.org/doc/item/responding-to-emailed-agendas
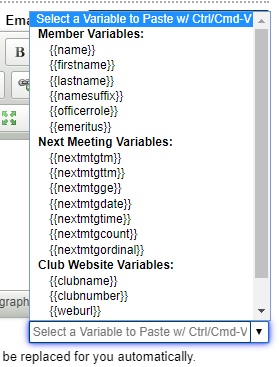
Email Variables
The Email Variables drop-down allows you to select variables to insert into your message that is sent with the agenda. The system will replace the variables with the corresponding values as it emails out the agenda. For instance, inserting the {{name}} variable allows you to "personalize" your message by including each members name in the message sent to them.
Email Tools
These allow you to use templates and signatures.
See separate Email Tools document.
- Details
- Category: Documentation
-
By Steve James
- Hits: 4950
Click the printer icon on the agenda button bar.

This will open a new dialog where you can select a layout and options for printing the currently displayed meeting agenda. Once you have selected your desired print settings and click Ok, a new page will open showing the printed view and with the printer dialogue open.
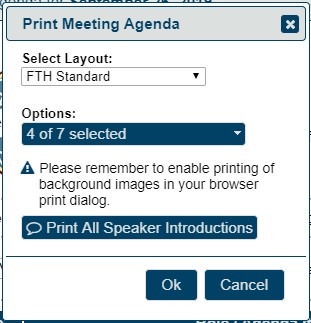
Note that these settings are different from print settings that you set via your browser print dialog.
In the above Print Meeting Agenda dialog, you can select a desired print layout and print options for FreeToastHost to use to compose your printed agenda. There are currently 5 print layouts some of which are strictly Black and White versions: FTH Standard, TM Layout, TM Layout-B&W, Hybrid Layout, and Hybrid Layout-B&W. You should try print previewing the various print layouts to determine what looks best for your meeting agenda.

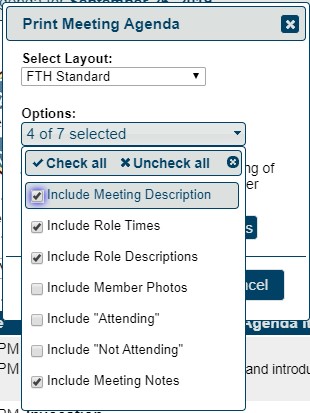
The Print Options allow you to include or omit different parts of the agenda and meeting information in your printed agenda. Keep in mind that including more features may result in using more paper and ink to print the agenda.
If you click the Print All Speaker Introductions button, a new page will display showing all the Speaker Introductions for the meeting formatted for easy printing. The print dialog will then display for you to easily print the Speaker Introductions shortly after you print your meeting agenda.
Adjusting page appearance
Your browser settings will have some effect on how the page appears when printed.
The following are worth checking:
- paper size
- paper orientation
- margins
- scaling
- shrink to page width (ignores scaling)
- browser headers and footers
- print background colours
- print background images
You can also choose to close the print dialogue and save the page as an HTML file. You can then open it in Word or other program for further editing. Additionally, your browser may provide the ability to convert the printed agenda to a PDF file. A PDF file is convenient because it keeps the formatting, but allows you to share it with others so that they can easily print it themselves.
Printing speech introductions

Look just above the speakers intro and you will see a little printer icon.
The only people who see the icon are those members that can edit the agenda. (Usually the Toastmaster, VPE, President, and Website Admin)
This icon allows you to print a single Speaker Introduction. As noted above, all of the speaker introductions can be printed at once via the Print Meeting Agenda button.
- Details
- Category: Documentation
-
By Jane Atkinson
- Hits: 4132
Web page tools are found just above the WYSIWYG editor on the right hand side.

They include the following:—
Save contents to file
This tool saves the source (html) code of your page to a file on your computer.
The text is saved to your browser's downloads folder.
Load contents from file
This tool allows you to load the source code that you saved earlier. It will replace what is already on the page.
An obvious use is for those times when something has gone horribly wrong, but it can also be used if, for example, you've had a special meeting and want to change your page back to its usual appearance afterwards.
Before loading the contents, make sure you are on the page you want to restore.
Choose "Load contents from file" from the pull-down menu and select the correct text file when prompted.
Replace Image/Photo
From time to time, you'll want to replace an existing image on a page with a new one. This tool allows you to do this in a single operation.

Choose Replace Image/Photo from the Web Page Tools pull-down menu.

Select the existing image you want to replace in the upper pull-down list, and select the replacement image in the lower pull-down list.
If the image you want to replace isn't on the server, you can upload it from your computer with the Upload Image button.
There is also an option to delete the original image from the server, if it is one that has previously been uploaded to your site. (You cannot remove system images.) If you're going to do this, make sure that you have a backup somewhere, in case you need it again in the future.
Rotate Image/Photo
Sometimes, you may insert an image in you page and discover that it's lying on its side, or even upside-down. Using this tool, you can quickly and easily re-orient the image.

Choose "Rotate image" in the Web Page Tools pull-down menu.

Choose the image from the pull-down list, then choose the amount of rotation you need and click Rotate Image/Photo.
Note: You can only choose increments of 90 degrees. You can't use this tool to create other angles of rotation. If you wish to do that, you'll need to use an image manipulation program.
Check for bad links
Broken links cause annoyance and detract from the value of your page. They also slow down page load performance, particularly in the cases of images. This item gives you a quick and easy way to check for them.

Choose Link Checker from the Web Page Tools pull-down menu.

You'll be shown a list of working links, plus any that aren't working properly. Anything in the second list needs to be removed or fixed. Note that this also will include any image references that are broken--if you deleted an image in the wrong way, for example.
Insert Web Page Variable
Web page variables are items that will update automatically as the information changes. They are especially useful for dates, such as the next meeting date, which change regularly.
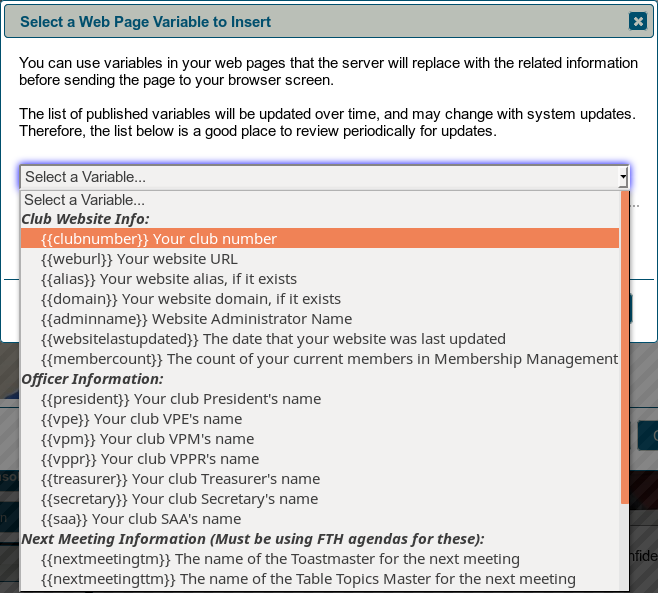
Select a variable from the pull-down list and, depending on your browser, it will be copied to the clipboard.
- Some browsers don't support this function. If the variable isn't copied, you can enter it yourself, making sure that it begins and ends with two curly braces.
The variable will still be visible in the page editor window after you've saved. To see the end result, close the editor.
In the case where the variable gets replaced by a photo or a map, the result may take up a significant portion of your available content width. Generally, you can wrap the variable in html "<div>" elements to control the width. If you are running into issues with this, please post a message in the support forums and we can coach you how to best handle this situation.
- Details
- Category: Documentation
-
By Jane Atkinson
- Hits: 3033
Currently, membership management settings are used for determining who receives the various emails regarding new member opt-ins. You can also make the system automatically send the New Member Welcome Email immediately after a new member clicks the approval link in the new member opt-in email.

Any one of the club officers can be selected from the pull-down menus.
The default is the website admin, if no one else is chosen; it's necessary for someone to receive these emails.
- Details
- Category: Documentation
-
By FreeToastHost
- Hits: 227920
Effective May 25, 2018
Cookie Policy
Our Cookie Policy explains what cookies are, how we use cookies, and what your choices are regarding cookies.
What are cookies?
Cookies are small text files stored on your computer by the web site you visit. Cookies usually remember your personal or website settings, such as your preferred language or address. Later, when you visit the same website, your browser returns these text files belonging to that website. This enables the website to display information adjusted to your preferences.
Which cookies do we use and why?
We use cookies to enhance your experience and allow you to customise your settings. Some examples include hiding member photos in the agenda and hiding the Toastmasters Convention advertisement. A cookie is also used to "remember" that you are logged in. Another notes that you've agreed to accept cookies.
In some cases, your browser will store cookies from other sites (3rd-party cookies). The main example is Google Analytics, which is used by some clubs for analysing their website traffic.
What are your choices regarding cookies
By disabling cookies, you decide to not allow cookies to be stored on your computer. You can do this by clicking on the "I do not agree to the policy" button in the dialogue box that appears when you first visit a site. Cookie settings can also be controlled and configured in your browser.
Please note, however, that by blocking cookies you will still be able to browse Toastmastersclubs websites, but some of the features will not be available. In particular, you won't be able to login.
Changes to our Cookie Policy
Any changes we may make to our Cookie Policy in the future will be posted on this page. Please check back frequently to be informed on any updates or changes to our Cookie Policy. This Cookie Policy replaces any previous cookie policies.
Contact
Questions, comments and requests regarding this Cookie Policy can be made on our support site.
More Articles …
Page 2 of 9
Latest Forum Posts
-
- Custome Web Pages
- In Public Forums / Support Requests
- 7 minutes ago
-
- Admin Getting Duplicate emails
- In Public Forums / General Discussion
- 2 hours 7 minutes ago
-
- Website administrative access
- In Public Forums / Support Requests
- 1 day 2 hours ago
-
- Junk in email subjects from members@address
- In Public Forums / Support Requests
- 1 day 13 hours ago
-
- Can't access the club website
- In Public Forums / Support Requests
- 3 days 4 hours ago